
GHPC, short for [Genetics|Genomics] High Performance Cluster is a resource sharing compute cluster dedicated to scientific computing. It caters to users from Quantitative Genetics and Genomics(QGG) at Aarhus University and also from industrial collaborators, researchers and students spread across the world.
Proudly serving 250 active users with 2048 CPU cores and 24.3 TiB of RAM, and whole suite of scientific software.
Browse through the sidebar to learn everything about GHPC.
Cheatsheet
 Click on the image or here to download as printable PDF
Found any errors? Have something to add? Would like to me to adress something in this wiki?
Please write to me at thami@qgg.au.dk
Hardware overview
GHPC is catering to users expecting to run heterogenous workloads - small to big, compute bound, IO bound, network bound etc. Based on prior experiences, GHPC uses multiple generations of Intel Xeon & AMD EPYC 9374F CPUs with HyperThreading enabled.
| Cluster | CPU type | # of nodes | # physical cores/node | # logical cores/node (Hyper threading) | RAM/node | RAM/(core or thread) | Network |
|---|---|---|---|---|---|---|---|
| GHPC | Skylake/Cascasde (14nm | 6/8 | 16 | 32 | 385/768 GiB | 11.7/24 GiB | 10Gbps |
| zen4 | Zen4_EPYC (5nm) | 9 | 64 | 128 | 1.5 TiB | 11.7 GiB | 10Gbps |
| nav_zen4 | Zen4_EPYC (5nm) | 2 | 64 | 128 | 1.5 TiB | 11.7 GiB | 10Gbps |
| nav | Skylake (14nm) | 6 | 16 | 32 | 385 GiB | 11.7 GiB | 10Gbps |
Hardware overview at the cluster
# ghpcinfo
PARTITION    AVAIL TIMELIMIT    CPUS(A/I/O/T)  S:C:T    FREE_MEM       NODELIST
zen4         up    45-12:00:00  460/692/0/1152 2:32:2   49704-1118296  epyc[01-09]
nav_zen4     up    45-12:00:00  14/242/0/256   2:32:2   1350332-152040 epyc[10-11]
ghpc         up    45-12:00:00  592/1008/0/160 2:8+:2   49704-1118296  cas[1-8],epyc[01-09],sky[006-008,011-013]
ghpc_short   up    1-01:00:00   8/24/0/32      2:8:2    357323         sky008
nav          up    45-12:00:00  14/434/0/448   2:8+:2   302291-1520405 epyc[10-11],sky[001-005,014]
Getting started
You need an account provisioned by your sysadmin to get started with using GHPC. Follow along to know how to create an account, connect to the cluster via SSH, transfer files to/from GHPC.
Creating an account
The primary way of interacting with the GHPC cluster is via SSH. You need a unified GHPC account created by the GHPC admin team before you can log in and use the cluster. If you are a new member of QGG or one of our research partners, please follow the instructions below.
Request a GHPC account
New GHPC user accounts must be requested through the GHPC User Account Request Portal. The request is checked against the GHPC username database and reviewed by the GHPC admin team.
Please prepare your full name, email address, PI/contact person, team/access area, and SSH public key before submitting the request.
Before you start
GHPC uses SSH public-key authentication. You will create an SSH key pair on your own computer:
- Public key: this is safe to share and must be submitted in the GHPC user request form.
- Private key: this is your personal login credential. Never share it with anyone, including the GHPC admin team.
The sections below explain how to create or find your SSH public key on Windows, Mac, and GNU/Linux.
 If you are a Windows user There are two methods
Method 1: PuTTY-based setup
Step 1: Download PuTTY and PuTTYgen
 Download PuTTYgen: https://the.earth.li/~sgtatham/putty/latest/w64/puttygen.exe
![]() Download PuTTY: https://the.earth.li/~sgtatham/putty/latest/w64/putty.exe
Download PuTTY: https://the.earth.li/~sgtatham/putty/latest/w64/putty.exe
Step 2: Generate SSH keys
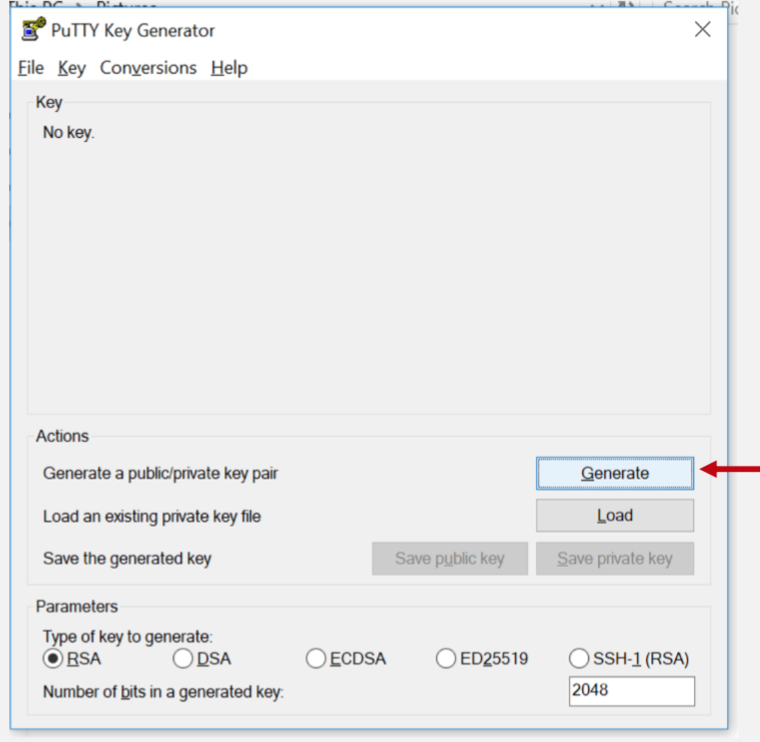
puttygen.exe and click the Generate button.
Keep moving the mouse to generate some randomness.
Step 3: Enter passphrase
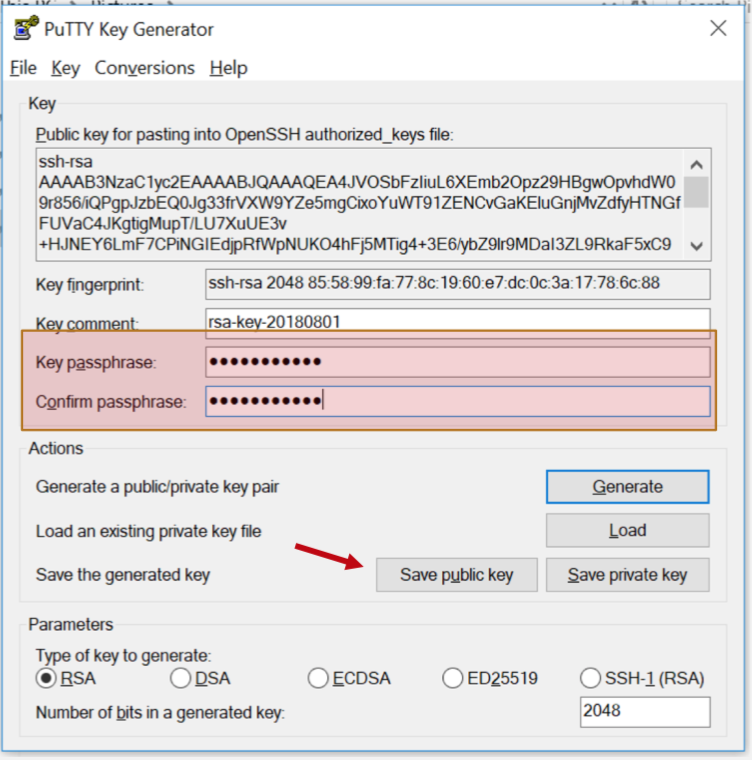
Then click Save public key.
Step 4: Save public key
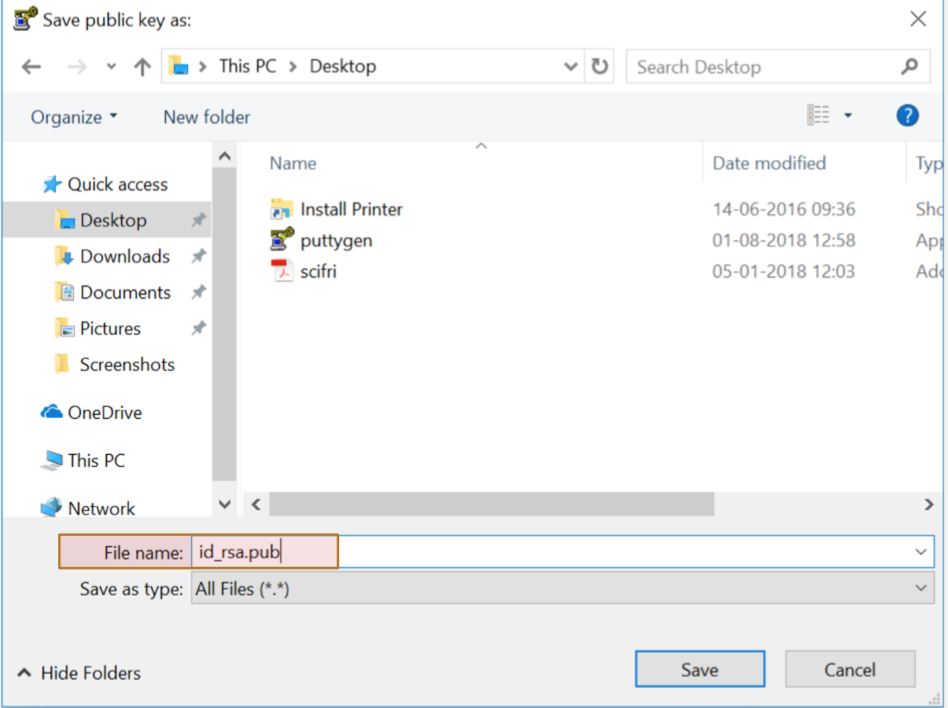
id_rsa.pub on your Desktop.
Step 5: Save private key
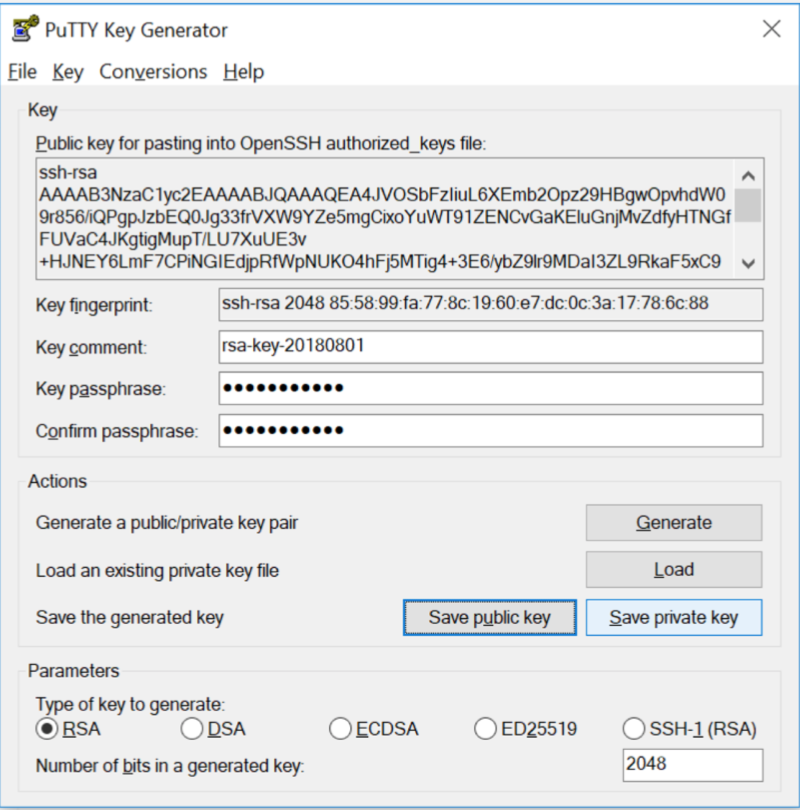
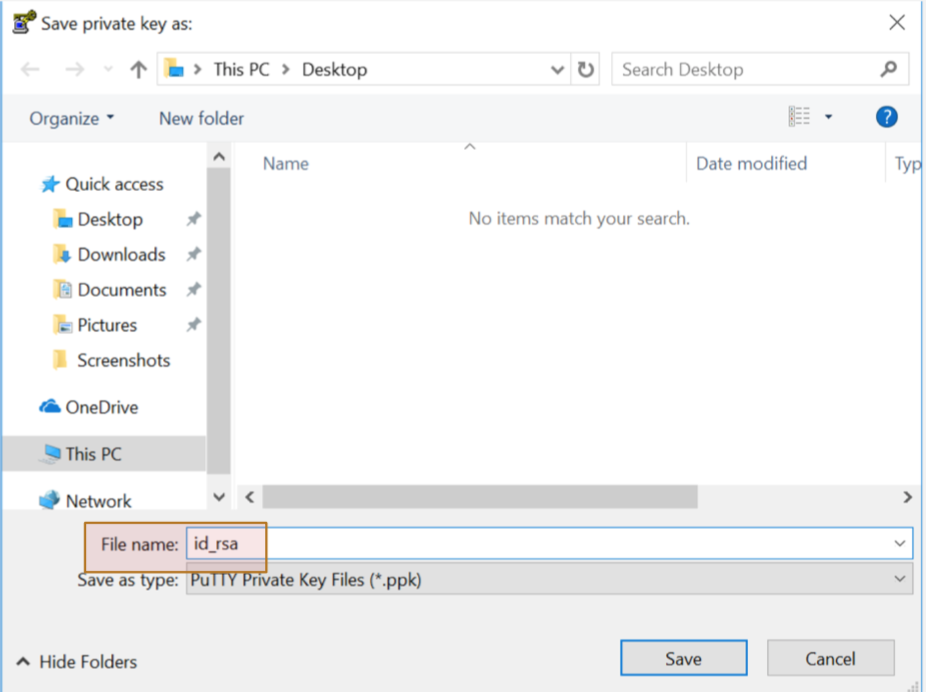
id_rsa on your Desktop.
Step 6: Submit the GHPC user request form
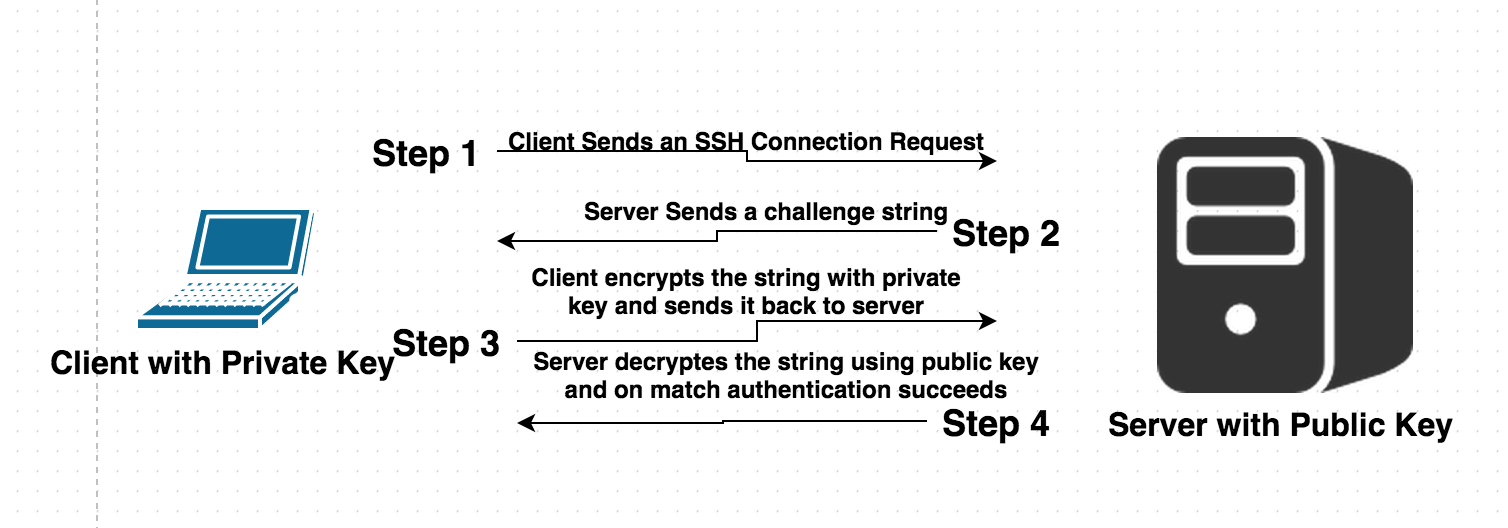
Understand how SSH works
id_rsa.pub, is the key you must submit in the GHPC user request form.
Open your saved public key file, id_rsa.pub, and copy the full contents of the file.
Then submit the GHPC user request form:
Paste the public key into the SSH public key field in the form.
Step 7: Wait for the GHPC admin team

After submitting the request, please wait for the GHPC admin team to review and create the account. You cannot connect to the cluster until your account has been created and your SSH public key has been added.
Method 2: Using Windows Terminal
This method is recommended for Windows 11 and newer Windows systems where OpenSSH is already available.
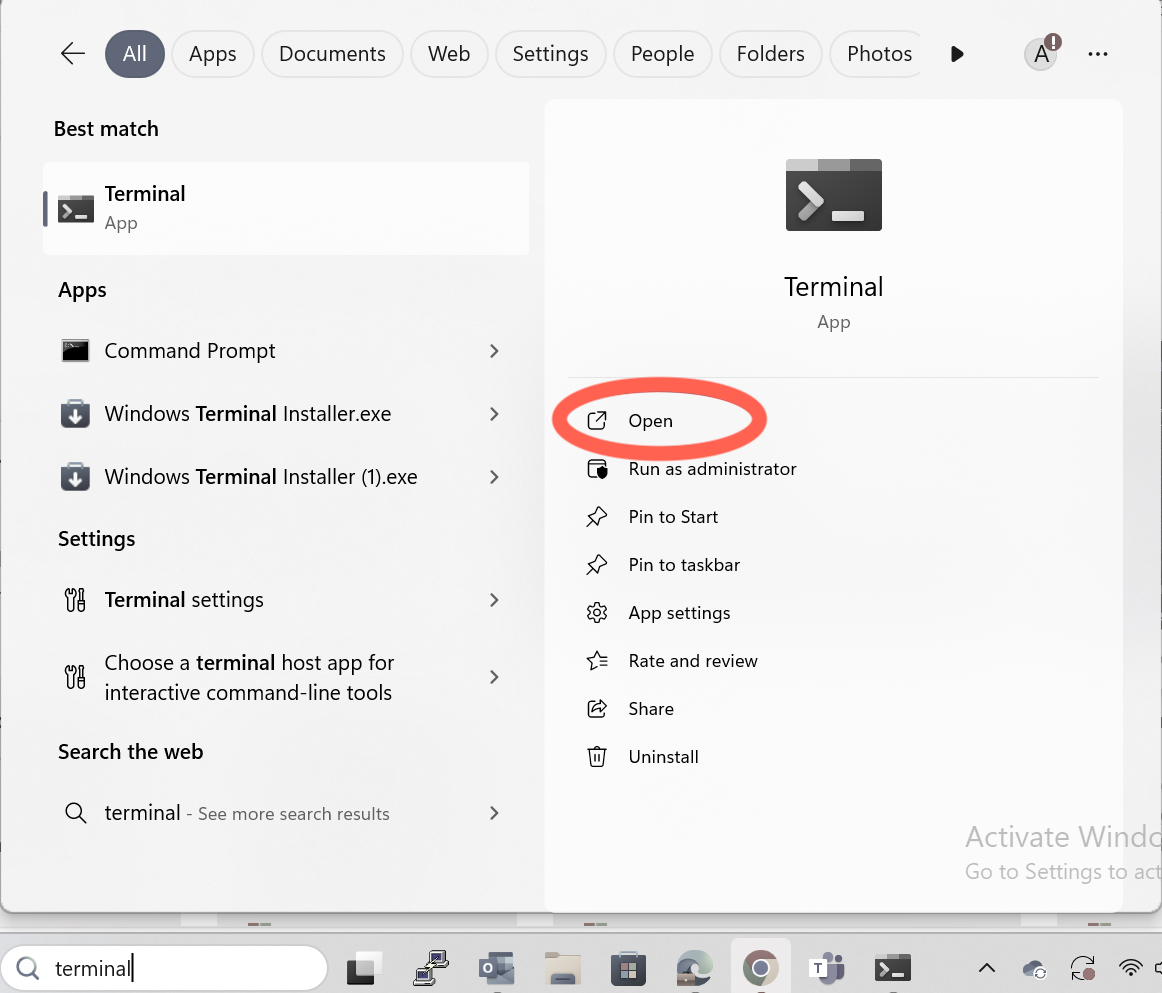
Step 1: Open Windows Terminal
Open the Windows search bar and type Terminal.

Click to open it.
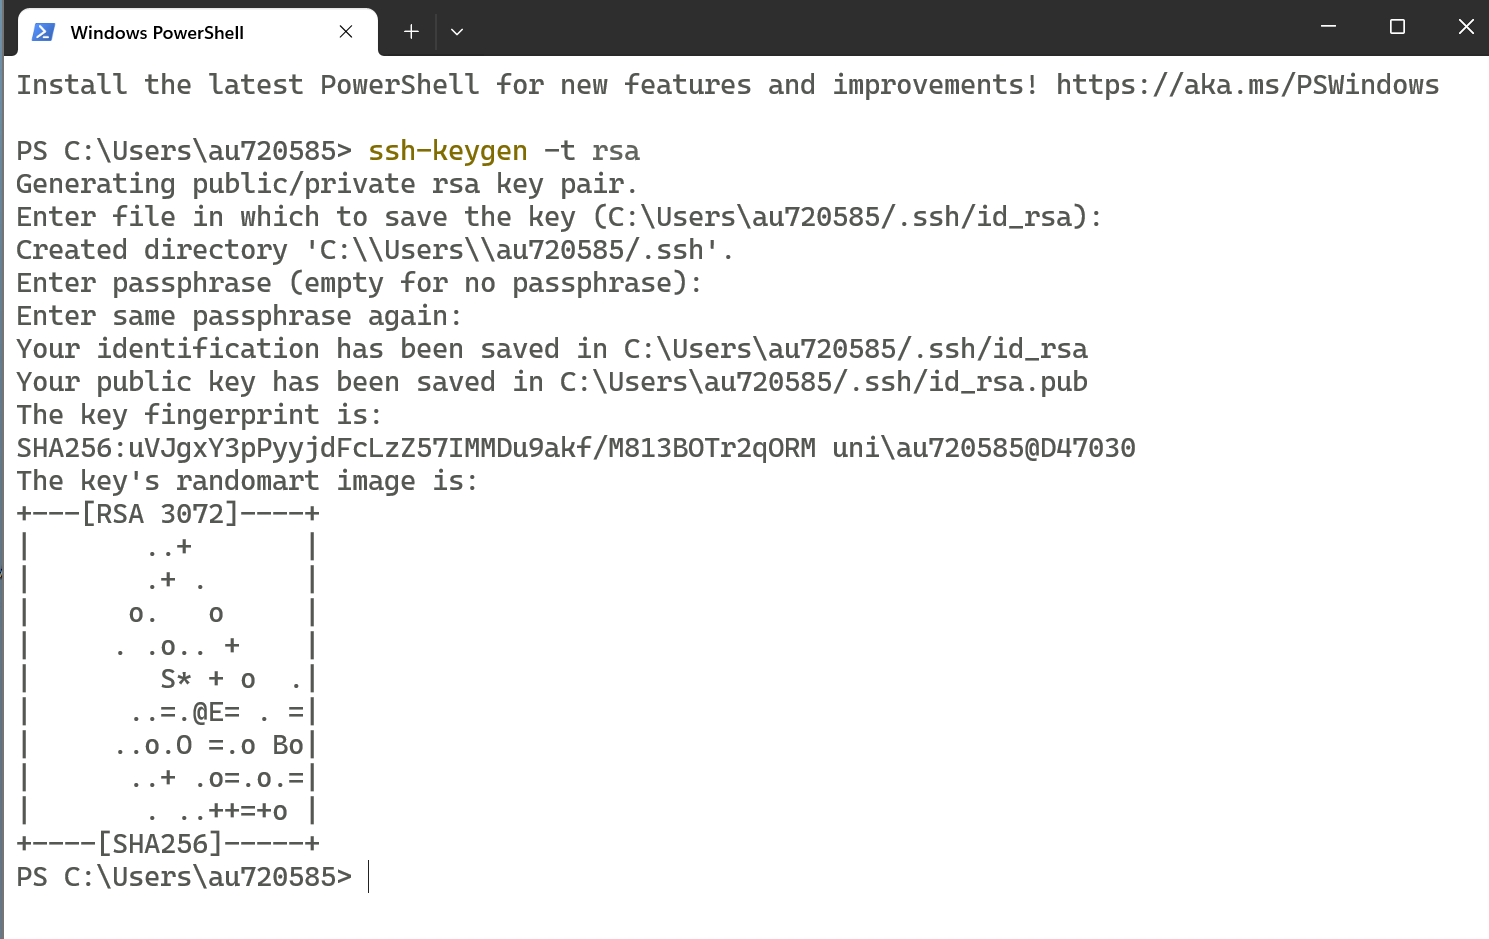
Step 2: Generate an SSH key
In the Terminal window, type the following command and press Enter:
ssh-keygen -t ed25519
When prompted, provide a passphrase and press Enter. This can be a word or sentence of your choice.
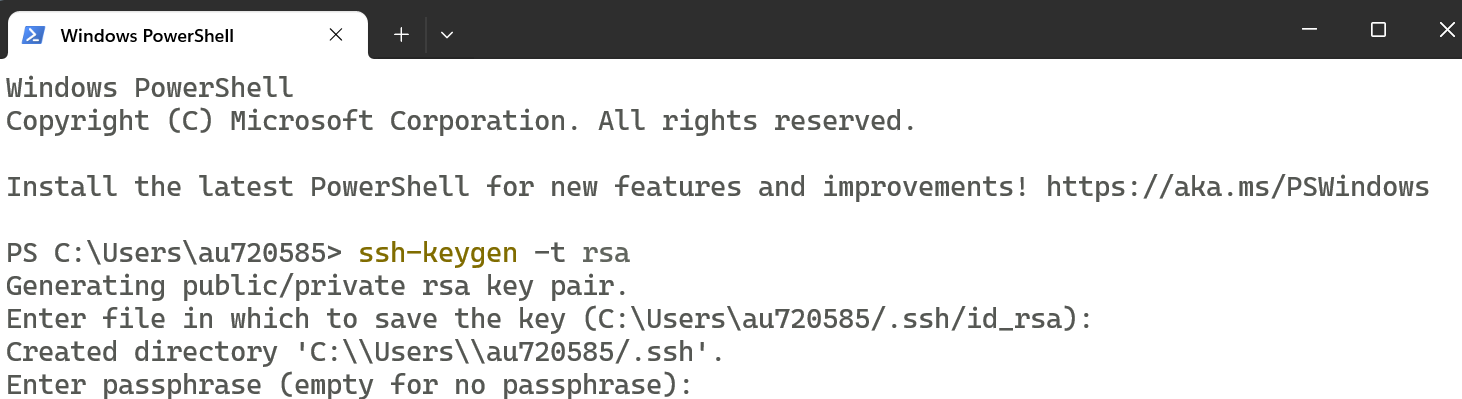
If your system does not support Ed25519 keys, you can use RSA instead:
ssh-keygen -t rsa -b 4096
Step 3: Complete the process
You will be asked to confirm your passphrase by entering it again.
After confirmation, your SSH keys will be created successfully.
Step 4: Copy your public key and submit the request form
Type one of the following commands to print your public key.
If you generated an Ed25519 key:
cat ~/.ssh/id_ed25519.pub
If you generated an RSA key:
cat ~/.ssh/id_rsa.pub

ssh-ed25519 or ssh-rsa.
Then submit the GHPC user request form:
Paste the copied public key into the SSH public key field.
Important: Do not copy or share your private key. Only the
.pubfile or the output fromcat ~/.ssh/id_ed25519.puborcat ~/.ssh/id_rsa.pubshould be submitted.
 /
/  If you are a Mac or GNU/Linux user
Open Terminal.
First check whether you already have an SSH public key:
ls ~/.ssh/id_ed25519.pub ~/.ssh/id_rsa.pub 2>/dev/null
If you see a .pub file, you already have a public key. Print it with one of the following commands.
For Ed25519:
cat ~/.ssh/id_ed25519.pub
For RSA:
cat ~/.ssh/id_rsa.pub
Copy the full output and submit it through the GHPC user request form:
Paste the copied public key into the SSH public key field.
If you do not have an SSH key, generate one:
ssh-keygen -t ed25519
When prompted, enter a passphrase. A passphrase helps protect your key if someone gets access to your computer.
If your system does not support Ed25519 keys, you can use RSA instead:
ssh-keygen -t rsa -b 4096
After the key is created, print your public key.
For Ed25519:
cat ~/.ssh/id_ed25519.pub
For RSA:
cat ~/.ssh/id_rsa.pub
Copy the full output and submit it through the GHPC user request form:
Important: Never share your private key. Only share the public key, which normally ends with
.pub.
After submitting the request, please wait for the GHPC admin team to review and create the account. You cannot connect to the cluster until your account has been created and your SSH public key has been added.
Connecting to the cluster (AU users only)
As an Aarhus University researcher/employee/student with an AU ID, you do not need to use second factor authentication as long as you're already connected to AU network either by connecting via Ethernet cable(from the wall) or via AU VPN.
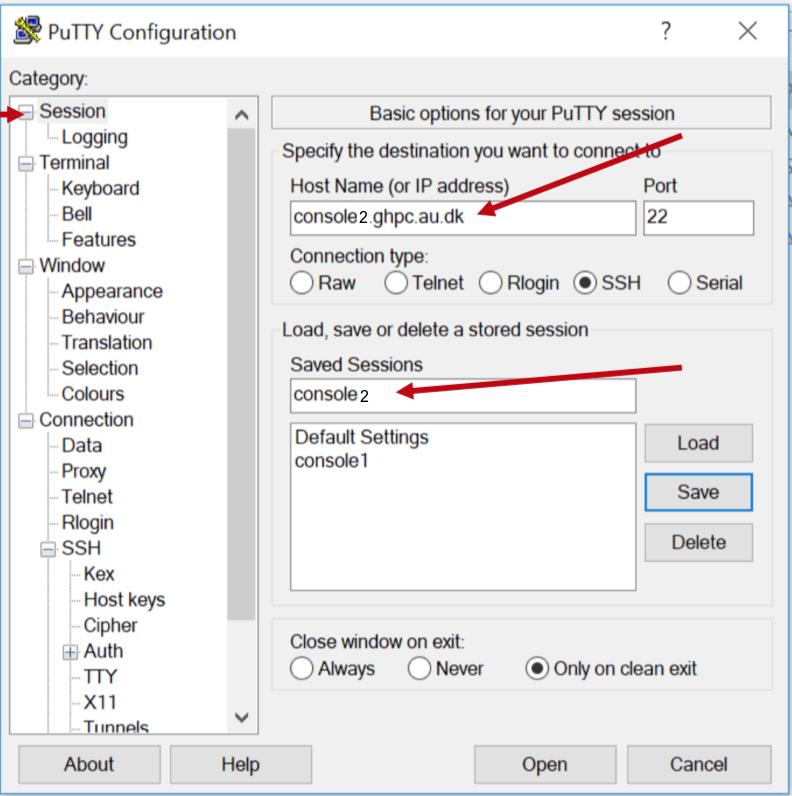
So, while you're somehow on AU network, connect to console2.ghpc.au.dk via SSH.
If you're a Windows user:
Method 1
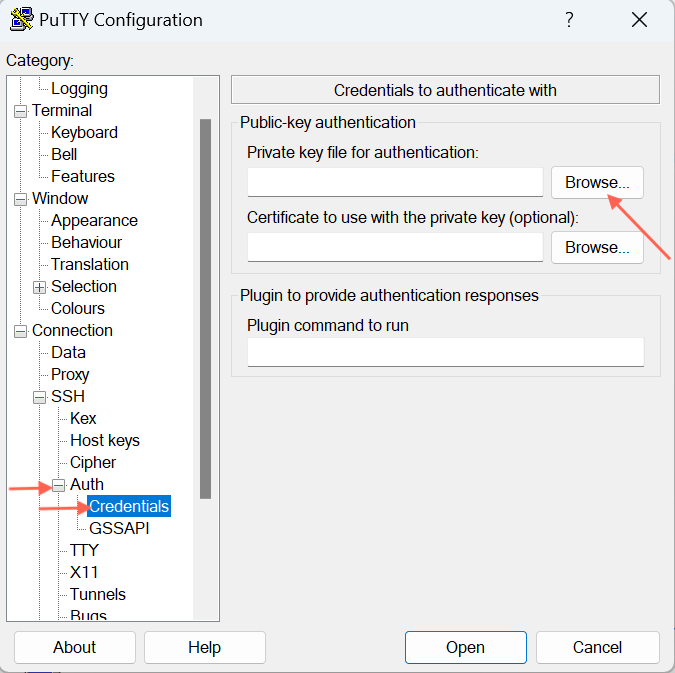
Open Putty
On the left pane labeled 'Category,' look for 'Auth,' expand it, and then click on 'Credentials'.
On the right pane where it asks for "Private key for authentication", hit Browse to select your private key file - the one named id_rsa.ppk whereever you saved from earlier instructions.

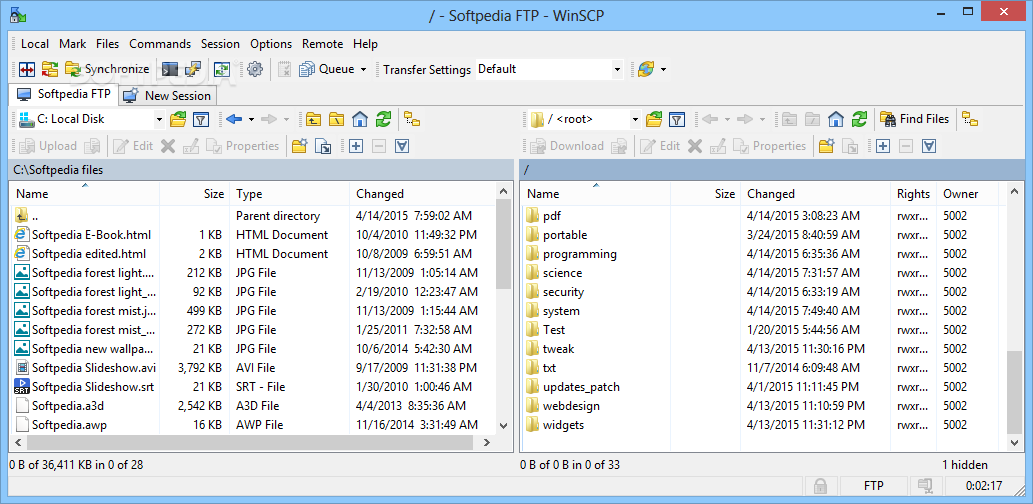
WinSCP for accessing your home directory using a GUI
WinSCP is a commonly used SFTP tool that lets you access your GHPC home directory using a GUI, thereby enabling to easily drag and drop files in/out of GHPC.
To use WinSCP, check if you already have it installed in your computer. If not, Google it and install it on your computer.
Next, open it. You will see a "Tools" button on the bottom left.
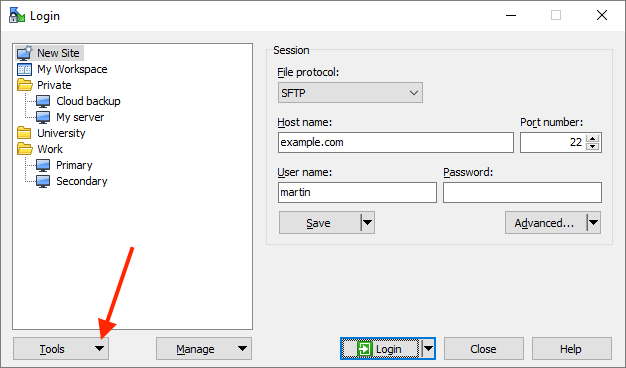
Choose - Import sites. It will list the names of sessions you have saved via Putty. For example, if you had saved your Putty session using the name console2, "check" console2 and hit Ok button. Voila, now Putty knows how to connect to that server.
Do the usual way of trying to connect to the server, and it will show your home directory graphically.
Method 2
Open Windows Terminal and login via SSH.
ssh username@console2.ghpc.au.dk
If you're a Mac or GNU/Linux user:
Open Terminal or iTerm2 or whichever terminal program you use, and login via SSH.
ssh <username>@console2.ghpc.au.dk
Connecting to the cluster (External users only)
As a non AU user, you need to enroll for second factor authentication to be able to use SSH at GHPC - per Aarhus University's security policy. The following steps will guide you to get started.
You will need a smartphone to install the "Duo Mobile" app or the ability to receive SMS at a phone number to be able to use the second factor authentication.
If you're a Windows user:
Step 1: Trying to log in via SSH
Open Putty
On the left pane labeled 'Category,' look for 'Auth,' expand it, and then click on 'Credentials'.
On the right pane where it asks for "Private key for authentication", hit Browse to select your private key file - the one named id_rsa.ppk wherever you saved from earlier instructions.
When you open a session for the first time, you will be asked whether you trust console1.ghpc.au.dk - hit "Yes"
Your session will end after reporting the following message. This is normal expected behavior because you're not enrolled with Duo yet.
something like below: <you will have a unique link that is not he same as below>
Please enroll at https://api-2af345907.duosecurity.com/portal?code=f16836be34a574fd&akey=DAFWLIYCMZT545OFWAD401

something like below: <you will have a unique link that is not he same as below>
Please enroll at https://api-2af345907.duosecurity.com/portal?code=f16836be34a574fd&akey=DAFWLIYCMZT545OFWAD401

something like below: <you will have a unique link that is not he same as below>
Please enroll at https://api-2af345907.duosecurity.com/portal?code=f16836be34a574fd&akey=DAFWLIYCMZT545OFWAD401

Access Denied.
Step 2: Enrolling with Duo
Visiting the url in a web browser will take you through the following steps.

Hit Start setup button,

You can choose your second factor device. Assuming Mobile phone as it is the most common second factor.

Enter a mobile number where you can receive text messages. Hit Continue,

Get a phone call or a Text to know the one time 6 digit code. Enter it, and hit Verify.

Choose “Automatically send this device a Duo Push” to use the Mobile app to get notification for approval.
Now, on your Android or ios phone, find and download the Duo app.
Duo Mobile App for iPhone : Download Duo Mobile from iTunes now
Duo Mobile App for Android : Download Duo Mobile from Google Play now
You get a notification that leads to something like this (stock image)

Hit approve and your 2nd factor is done.

The above enrollment is a one-time thing.
Step 3: Trying to log in via SSH (with 2FA)
Open Putty and double click on the "Console1" session you had saved earlier.
You should get a notification on your phone with the Duo Mobile app. Hit the "Approve" button in green, and you should be logged in automatically at the Putty window.
You will need to repeat this step for everytime you like to connect to the SSH server.
If you're a Mac or GNU/Linux or Windows Terminal user:
Open Terminal or iTerm2 or whichever terminal program you use, and login via SSH.
ssh <username>@console1.ghpc.au.dk
You will get an "Access denied" message along with enrollment links as shown below. Your session will end after reporting the following message. This is normal expected behavior because you're not enrolled with Duo yet.
something like below: <you will have a unique link that is not he same as below>
Please enroll at https://api-2af345907.duosecurity.com/portal?code=f16836be34a574fd&akey=DAFWLIYCMZT545OFWAD401

something like below: <you will have a unique link that is not he same as below>
Please enroll at https://api-2af345907.duosecurity.com/portal?code=f16836be34a574fd&akey=DAFWLIYCMZT545OFWAD401

something like below: <you will have a unique link that is not he same as below>
Please enroll at https://api-2af345907.duosecurity.com/portal?code=f16836be34a574fd&akey=DAFWLIYCMZT545OFWAD401

Access Denied.
Continue with enrollment as described in Step 2 here
Once enrollment is done,
login via SSH as you did earlier.
ssh <username>@console1.ghpc.au.dk
This time you will be prompted to approve the request on your phone in the Duo Mobile App. Once you approve, your SSH login will be complete.
Using GHPC console
Purpose of console[1,2] servers
Login nodes are intended for basic tasks such as uploading data, managing files, compiling software, editing scripts, and checking on or managing your jobs. Small-scale interactive work may also be acceptable if your resource requirements are minimal. Remember that when you are using a login node, there are generally many other people also using the same login node. Using too many resources on a login node may negatively affect the ability of other people to complete their work. Login nodes on the clusters have memory limits, so please be aware that if you run a process on the login node that goes beyond a certain amount, it may be killed.
The console servers - console1.ghpc.au.dk(External users) and console2.ghpc.au.dk(AU internal users) are intended to be used as a front end to the SLURM compute cluster and to perform basic tasks such as uploading data, managing files, compiling software, and editing scripts that will eventually be run in the cluster. They are NOT high power servers capable of running high load scientific work.
Eventhough the server is configured to limit the potential for user abuse, if you try to run your heavy scripts directly on the console server and slow down the server for other users, all your running processes will be killed abruptly, and your user account will be locked until you can discuss with the sysadmin about the serious inconvenience you just caused to everybody.
If you're in doubt, ask your sysadmin - thami@qgg.au.dk or your senior colleagues.
Operating system
The console servers run Debian 12 and runs bash as the default shell. The default language is set to en_US (English - United States). If you have special customisation needs, please contact your sysadmin.
Prompt and dot file customisations
Users of Console[1,2] are expected to have their user-level customisations in ".profile". If you're moving to Console1 from the old cluster, you may want to copy your old dot file contents into .profile.
Your sysadmin's .profile looks like below: (as an example for you to customise)
# Get the aliases and functions
if [ -f ~/.bashrc ]; then
        . ~/.bashrc
fi

# User specific environment and startup programs

PATH=$PATH:$HOME/bin
export PATH
unset USERNAME
export PS1="\u@\h:[\w] > \[$(tput sgr0)\]"
alias ls='ls -alh --color=auto'
alias ..="cd .."
alias cd..="cd .."
alias ...="cd ../.."
alias ....="cd ../../.."
alias .....="cd ../../../.."
# Get week number
alias week='date +%V'
# Stopwatch
alias timer='echo "Timer started. Stop with Ctrl-D." && date && time cat && date'

function whereis (){
  find . -name "$1*";
}

# Use standard ISO 8601 timestamp
# %F equivalent to %Y-%m-%d
# %T equivalent to %H:%M:%S (24-hours format)
export HISTTIMEFORMAT='%F %T '

# keep history up to date, across sessions, in realtime
#  http://unix.stackexchange.com/a/48113
export HISTCONTROL="erasedups:ignoreboth"	# no duplicate entries
export HISTSIZE=100000                          # big big history (default=500)
export HISTFILESIZE=$HISTSIZE                   # big big history
type shopt &> /dev/null && shopt -s histappend  # append to history, !overwrite
Transferring files to/from GHPC
The only protocol supported to transfer data in/out of GHPC is SFTP (SSH File Transfer Protocol). It works based on your SSH credentials.
You can use tools such as WinSCP, and CyberDuck to access the same ssh servers console[1,2].ghpc.au.dk
Note: If you're an external user, you will be prompted for second factor authentication via your tool. If your tool does not support MFA(Example: Ultraedit), they are not supported by GHPC.
Be cautious about file transfers and be aware of your obligations for data confidentiality. All your actions are logged on GHPC servers, and will be provided upon audit should there be a need.
WinSCP for accessing your home directory using a GUI
WinSCP is a commonly used SFTP tool that lets you access your GHPC home directory using a GUI, thereby enabling to easily drag and drop files in/out of GHPC.
To use WinSCP, check if you already have it installed in your computer. If not, Google it and install it on your computer.
Next, open it. You will see a "Tools" button on the bottom left.
Choose - Import sites. It will list the names of sessions you have saved via Putty. For example, if you had saved your Putty session using the name console2, "check" console2 and hit Ok button. Voila, now Putty knows how to connect to that server.
Do the usual way of trying to connect to the server, and it will show your home directory graphically.
Expert users
You may be able to mount your home directory in the cluster as yet another drive/directory on your computer using programs like Mountain duck ($$$ paid software)
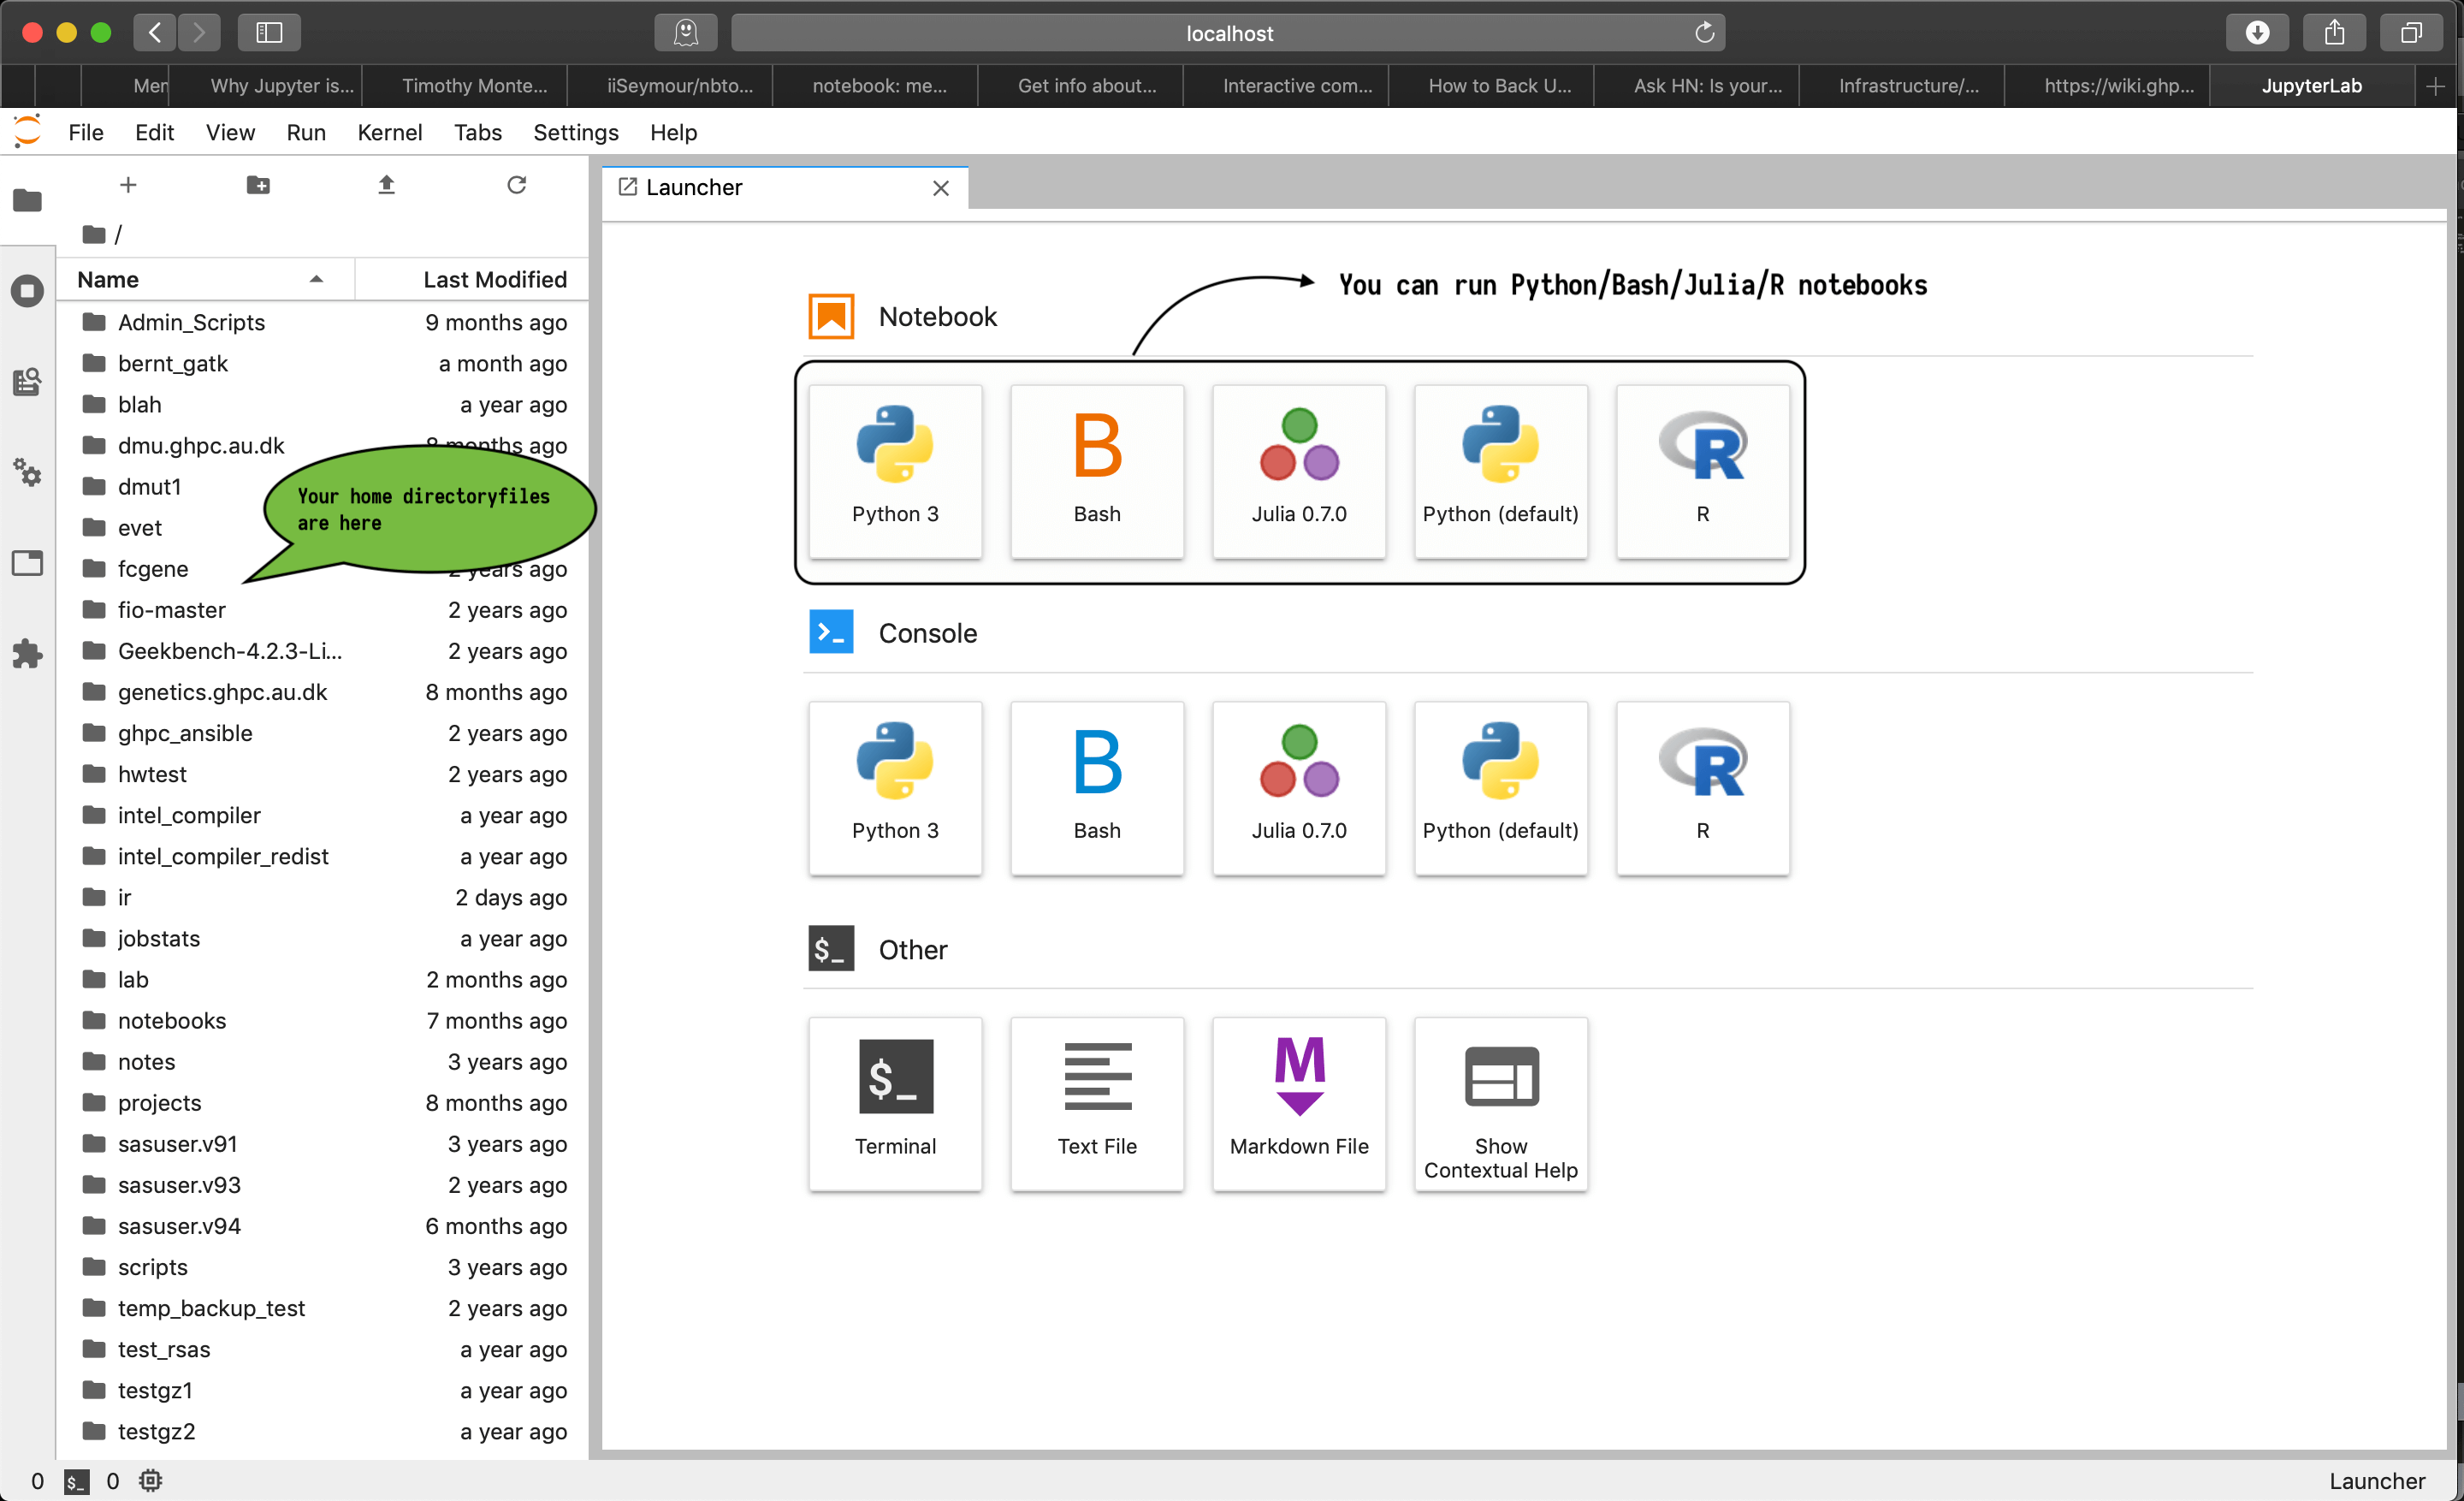
Interactive computing with Jupyterlab
Jupyter is a service that allows scientists to work with "notebooks" - a single document that contains live code, output of the code, narrative text, charts and figures all together.
Reproducible science
Often times, you wish you could get an idea of how the author of a blogpost/software library/paper performed their computation and arrived at their result. At times, the process is more educating than the result itself. Jupyter notebook could be an answer to that wish.
It's simple - it works like a digital notebook that happens to have places where you can insert your code, and see its output interactively. You can add notes just like you normally would on a notebook. At the end, you can send that one notebook to anyone who wants to retrace your steps. Sending your paper for review? Asking your peers to look at your code? just send your notebook so they can follow along step-by-step.
How does it look?

How do I login?
Jupyterhub is not a publicly accessible service at GHPC.
You need to set up a SSH tunnel and login as you normally would via SSH in order to be able to reach the Jupyterhub service.
If you're a Windows user:
You probably already have a Putty session saved to access the cluster.
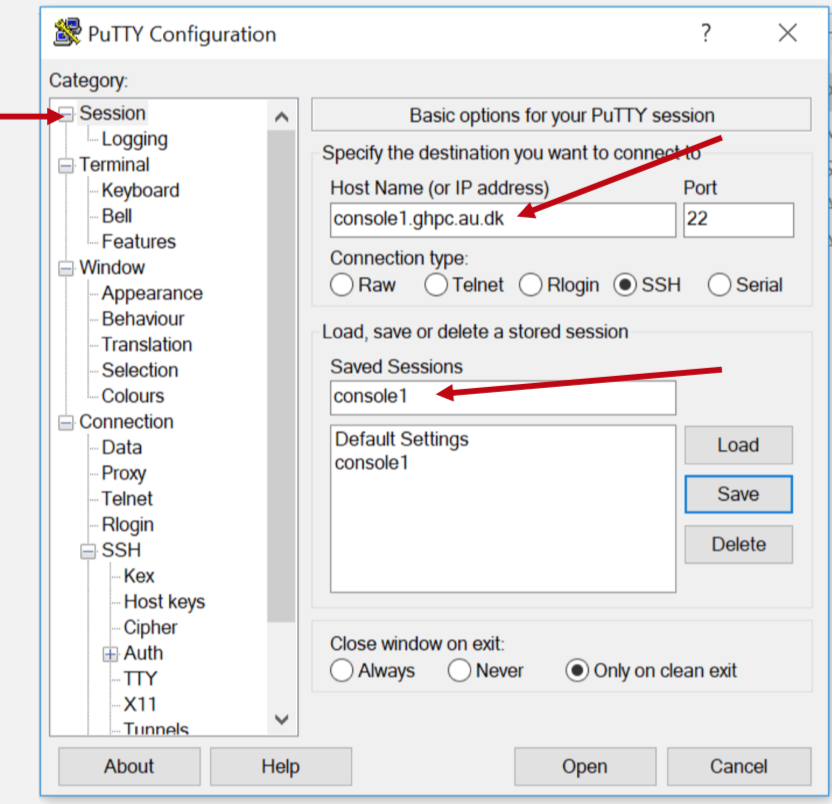
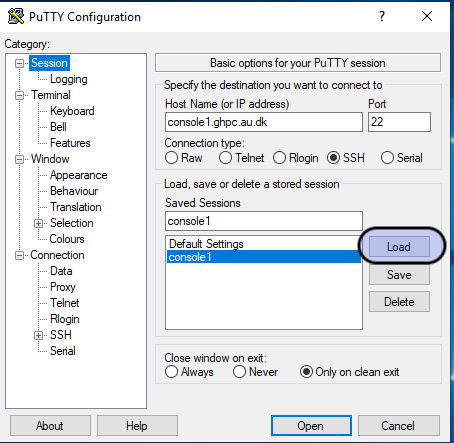
Open Putty, click on your saved session (in the screenshot - console1. You may have saved it with a different name), and hit the "Load" button.
On the left hand side of the Putty window - Category, click on Connection -> SSH -> Tunnels
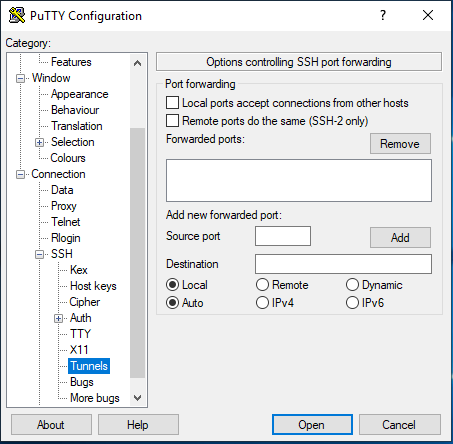
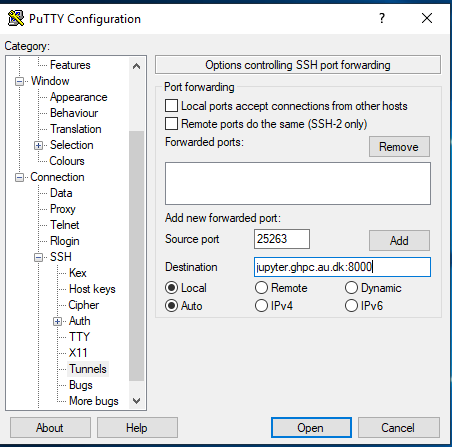
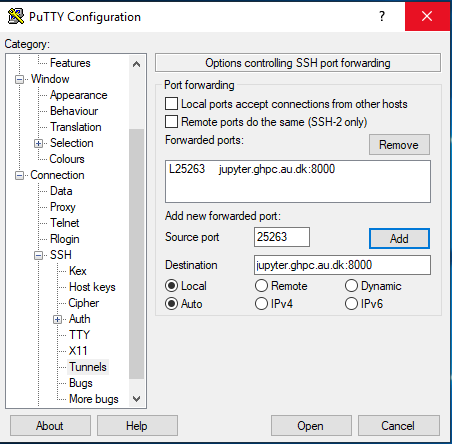
Enter source port as 25263 and Destination as jupyter.ghpc.au.dk:8000 and hit the Add button.
Once you hit add, it should look like this.
Click on "Session" on the left pane of the window to go to the main screen again. Now, click the "save" button.
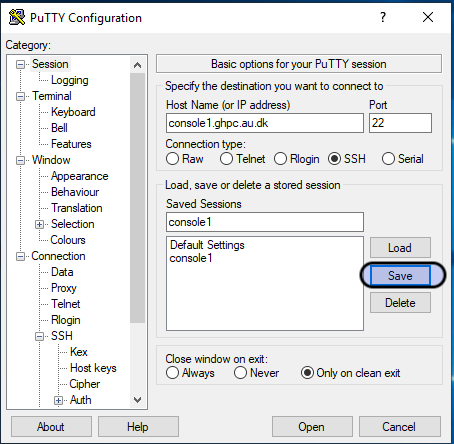
Now, you are all set with the tunnel. This was an one-time thing. From now on, you can simply click on the saved name and Hit Open.
Which leads to something like this - that you are already familiar with..
Leave it aside, and click on this this url (bookmark this if you will use the tool regularly).
This should lead you to ..
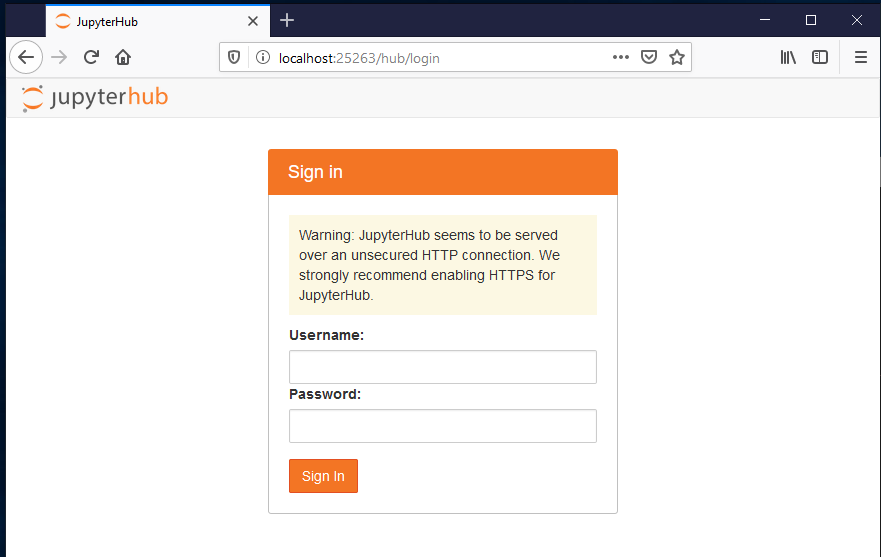
Login here just as you would with your username for SSH access. and password (that your sysadmin sent you).

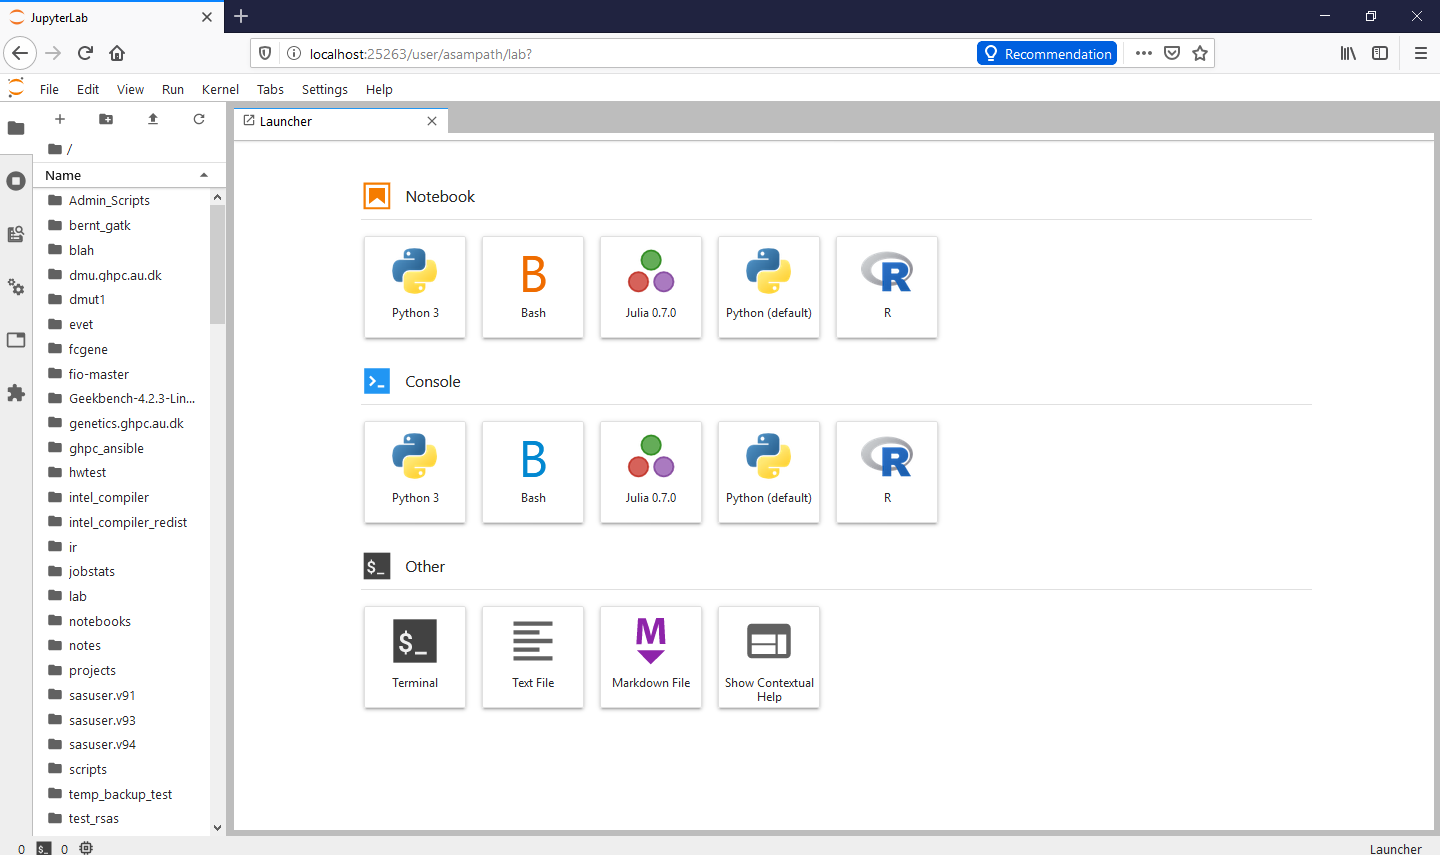
and it should get you to home page :
/ If you're a Mac or GNULinux or Windows Terminal user:
Open Terminal or iTerm2 or whichever terminal program you use, and login via SSH, just that you include the tunnel in your SSH command.
Instead of
ssh <username>@console2.ghpc.au.dk
You should use
ssh -L 25263:jupyter.ghpc.au.dk:8000 -A <username>@console1.ghpc.au.dk
Leave that terminal window aside, and click on the link below to get started.. (bookmark this if you will use the tool regularly)
This should lead you to ..
Login here just as you would with your username for SSH access. and password (that your sysadmin sent you).
and it should get you to home page :
Okay, I'm in, but how do I use this? tutorial?
Creating Your First Notebook
Lets use Python notebook as an example, although the concepts are exactly the same for any language within Jupyter.
On Jupyter home page, under the "Notebook" section click on the "Python (default)" button.
This should get you to a new notebook that looks like below. Pay attention to its elements.
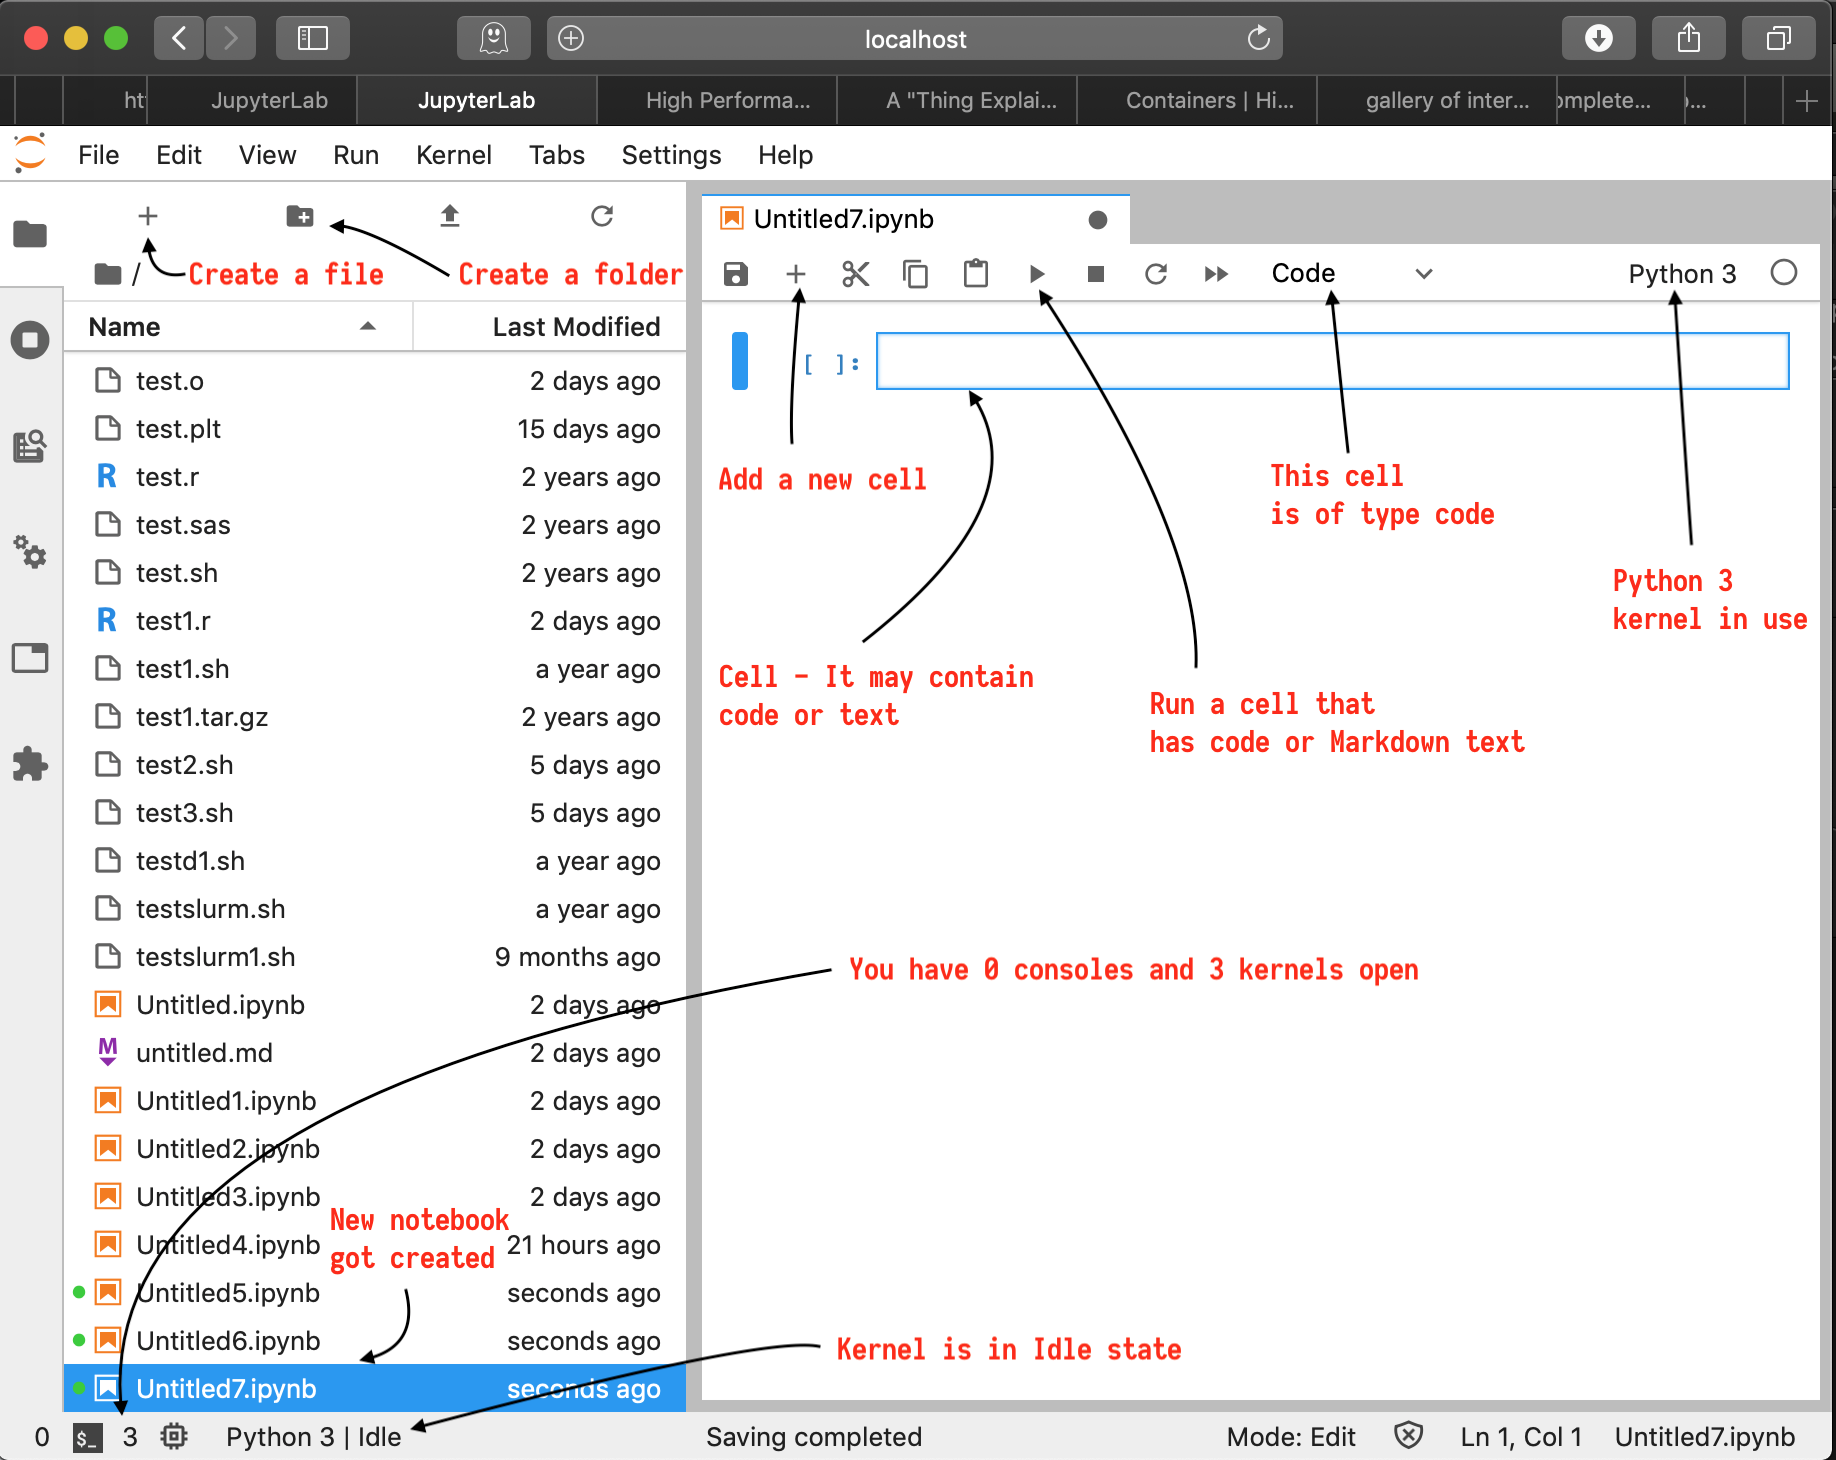
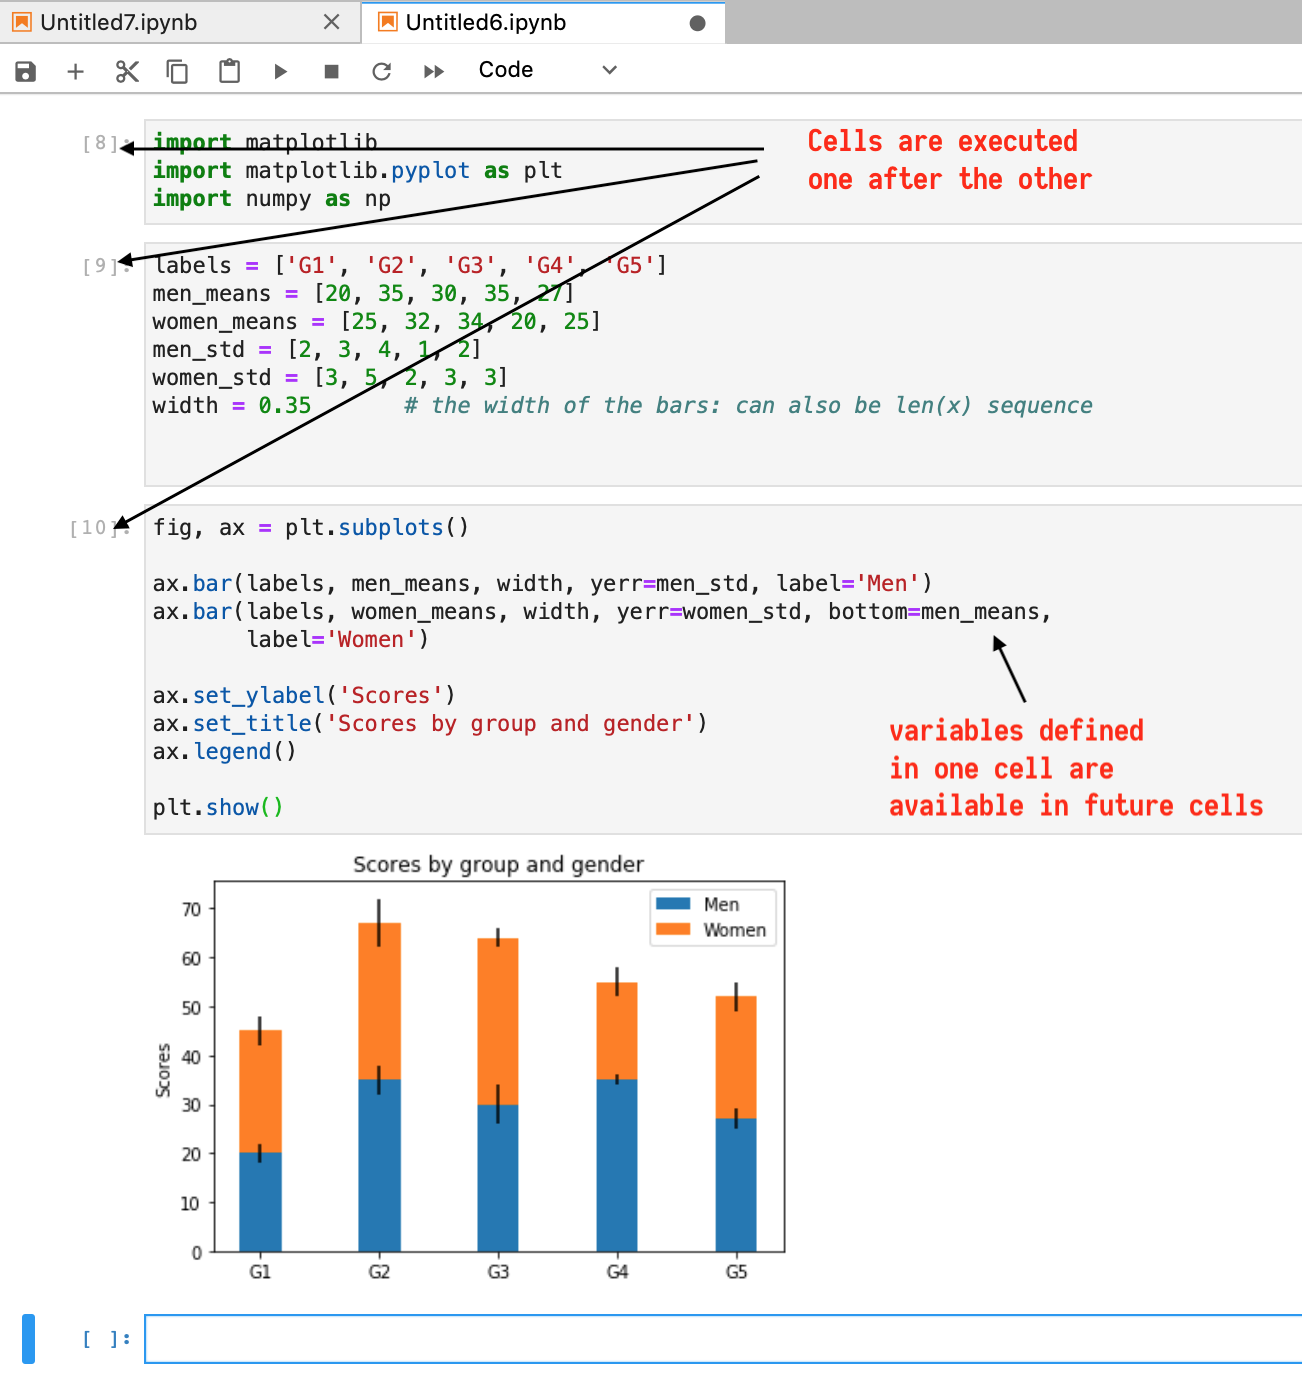
When you clicked on "Python (default)" button, it automatically created a new notebook for you and associated it with a "Python 3" kernel. Now, you can go ahead and use this notebook to write Python3 code and annotate with Markdown text and display charts and graphs.
What is an ipynb File?
Each .ipynb file is a text file that describes the contents of your notebook in a format called JSON. Each cell and its contents, including image attachments that have been converted into strings of text, is listed therein along with some metadata. You can save your work and transport this .ipynb file to other locations to "view your notebook".
The Notebook Interface
Cells form the key elements of the notebook. A cell is where you write code or text into.
A cell may be of two important types :
- code cell - used for code that will be executed if you run the cell.
- Markdown cell - used for text that will be rendered as Markdown if you run the cell.
For example, type the following Python code into a cell :
print('Hello World!')
and hit the  button or the keyboard shortcut (Shift + Enter) to run the cell.
You'd see the ouput inline as shown below.

Notice that the focus goes on to the next cell and you may continue with subsequent cells or go back and modify/re-run earlier cells.
The interpreter is waiting for you to code, while remembering all the executed cells. For example,
How about adding some text in your notebook using Markdown?
Click on the first cell, and hit the + button on the tool bar. This adds a new cell right below the current cell. You can drag it and drop it to the first position.
Now, try to change the type of the cell to Markdown.

Now, the cell type has been changed to Markdown and you can type in MArkdown text.

Just like the code cells, you can run the cell by using the run button or the shortcut Shift + enter. This will render the Markdown text as below.

Official guide of Markdown syntax is here: https://daringfireball.net/projects/markdown/syntax
You can explore the menus to do more things like
- Run all cells
- Run selective cells
- Interrupt the kernel
- Change to a different kernel
- Split cells
- Merge cells
- Rename your notebook file
- Import/Export your notebook etc.
These are left as an exercise to the reader. May Google be with you!
Softwares and libraries
GHPC standardises on Debian 12(at the time of writing) and your sysadmin makes the best effort to keep the base operating environment updated to the latest enterprise setup.

Check /opt/ghpc on console nodes or the compute nodes to see if the software you need is already made available.
Usage of binary compiled code
It is true that you can compile software on any x86_64 environment and transfer the binaries to run on GHPC. But, be aware that it is NOT the most optimal way of handling your needs.
- Code compiled on newer CPUs may potentially crash while running on older gen servers in GHPC.
- Code compiled on older CPUs may run much slower on GHPC because the newly available instructions are not used when you compiled.
- Scientific software that particularly relies on AVX, AVX2 or AVX-512 vector instructions could be utilised only if you compile your software appropriately and preferably within GHPC.
If you're not sure, ask.
Requesting new softwares or libraries
First check whether the software you're looking for exists in /opt/ghpc. If not, write an email to your sysadmin with clear details about what software you need, along with version, where to get it from etc.
Commonly used softwares
SAS is accessible at /opt/SAS/bin/sas and is aliased as sas for easy use.
R is accessible at /opt/ghpc/bin/R and is aliased as R for easy use. If you encounter any library-related issues, try using /opt/ghpc/R-4.0.4/bin/R, which is freshly compiled from a Debian system.
Python3 is accessible at /opt/ghpc/python3-current/bin/pythonand is aliased as python3
Python2 is accessible at /opt/ghpc/python2-current/bin/pythonand is aliased as python
Java is accessible at /opt/ghpc/jdk-current/bin/javaand is aliased as java
Common software packages
Pardon the dust
work in progress. check back later for a table of most commonly used software packages and their location in GHPC cluster.
DMU - http://www.dmu.agrsci.dk ADAM - http://adam.agrsci.dk/index.htm EVA - http://www.eva.agrsci.dk Bayz - http://bayz.biz/index.php?sc=11 Plink 1.9 http://zzz.bwh.harvard.edu/plink/plink2.shtml Beagle 5 https://faculty.washington.edu/browning/beagle/beagle_5.0_07Sep18.pdf (this is a moving target!) Bwa http://bio-bwa.sourceforge.net/bwa.shtml Samtools, bcftools, tabix http://www.htslib.org/doc/ GATK https://software.broadinstitute.org/gatk/documentation/ Picard https://broadinstitute.github.io/picard/command-line-overview.html NCBI-Blast https://www.ncbi.nlm.nih.gov/books/NBK279690/ (quite unreadable) SRA-Toolkit https://trace.ncbi.nlm.nih.gov/Traces/sra/sra.cgi?view=toolkit_doc Bamtools https://github.com/pezmaster31/bamtools/wiki/Tutorial_Toolkit_BamTools-1.0.pdf BamUtil https://genome.sph.umich.edu/wiki/BamUtil Trimmomatic http://www.usadellab.org/cms/uploads/supplementary/Trimmomatic/TrimmomaticManual_V0.32.pdf Vt https://genome.sph.umich.edu/wiki/Vt FastQC http://www.bioinformatics.babraham.ac.uk/projects/fastqc/Help/ Vcflib https://github.com/vcflib/vcflib Vcftools https://vcftools.github.io/man_latest.html Minimac4 https://genome.sph.umich.edu/wiki/Minimac4 VEP http://www.ensembl.org/info/docs/tools/vep/script/vep_options.html Cutadapt https://cutadapt.readthedocs.io/en/stable/
Convenience scripts (wrappers)
SAS
SAS scripts are usually self-contained, dealing with their input/output files as mentioned in the sas files itself. So, it is often easier to just run the file using sas binary. The wrapper - rsas does just that. It comes with sensible defaults, and still allowing the user to override with specific needs.
thami@console1:[~] > rsas

rsas -   Command to submit a sas file as batch job to run on GHPC

Usage: rsas [-w hh:mm:ss ] [-q Q] [-c C] [-m M] [-l L] FILENAME

       hh:mm:ss : specify the wallclock time allowed for the job.
                  (optional) default = 12:00:00

       Q        : specify the batch queue to be used.
                  (optional) default = ghpc
                  Options:  ghpc or zen4 or nav or nav_zen4

                  NAV users are expected to use nav or nav_zen4 queue.

                  QGG users can submit jobs to: ghpc and zen4

       C        : specify number of CPU cores to reserve.
                  (optional) default = 2
                  Options:  Min = 1, Max = depends on queue
                  Refer limits at https://wiki.ghpc.au.dk/limits.html

       M        : specify maximum amount of memory in MiB to reserve.
                  (optional) default = 5120 MiB(5 GiB)
                  Options:  Min = 512 MiB, Max = depends on CPU
                  Refer limits at https://wiki.ghpc.au.dk/limits.html

       L        : specify label or jobname for this job.
                  (optional) default = name of file

       FILENAME : Name of the sas program to be executed.
                  (Required)
                  FILENAME must end with .sas as file extension
                           must be in current directory
Typical execution would look like..
navthami@console1:[~] > rsas -q nav hello.sas

Generated command based on your options:
          sbatch -t 12:00:00 -p nav -n 2 --mem=5120 -J hello.sas --wrap="sas hello.sas"
Submitted batch job 570645
Job submitted successfully. Check its status using myst command.
rdmu5
rdmu5 is a wrapper script that makes it easier to submit DMU5 jobs in GHPC. The usage help of the wrapper is self-explanatory about the purpose of the script.
thami@console1:[~/dmut1] > rdmu5

rdmu5 -   Command to submit a DMU batch job to run on GHPC

Usage: rdmu5 [-w hh:mm:ss ] [-q Q] [-c C] [-m M] [-r R] JOBNAME

       hh:mm:ss : specify the wallclock time allowed for the job.
                  (optional) default = 12:00:00

       Q        : specify the batch queue to be used.
                  (optional) default = ghpc
                  Options:  ghpc or zen4 or nav or nav_zen4

                  NAV users are expected to use nav or nav_zen4 queue.

                  QGG users can submit jobs to: ghpc and zen4

       C        : specify number of CPU cores to reserve.
                  (optional) default = 1
                  Options:  Min = 1, Max = depends on queue
                  Refer limits at https://wiki.ghpc.au.dk/limits.html

       M        : specify maximum amount of memory in MiB to reserve.
                  (optional) default = 5120 MiB(5 GiB)
                  Options:  Min = 512 MiB, Max = depends on CPU
                  Refer limits at https://wiki.ghpc.au.dk/limits.html

       R        : specify the release of DMU version 6 to use for this job.
                  (optional) default = latest production version of DMU.
                   Options:  ?????????????????????????

       JOBNAME  : DMU driver file name.
                  (Required)
                  "JOBNAME.DIR" must be in current directory.
rdmu4
rdmu4 is a wrapper script that makes it easier to submit DMU4 jobs in GHPC. The usage help of the wrapper is self-explanatory about the purpose of the script.
thami@console1:[~/dmut1] > rdmu4

rdmu4 -   Command to submit a DMU batch job to run on GHPC

Usage: rdmu4 [-w hh:mm:ss ] [-q Q] [-c C] [-m M] [-r R] JOBNAME

       hh:mm:ss : specify the wallclock time allowed for the job.
                  (optional) default = 12:00:00

       Q        : specify the batch queue to be used.
                  (optional) default = ghpc
                  Options:  ghpc or zen4 or nav or nav_zen4

                  NAV users are expected to use nav or nav_zen4 queue.

                  QGG users can submit jobs to: ghpc and zen4

       C        : specify number of CPU cores to reserve.
                  (optional) default = 1
                  Options:  Min = 1, Max = depends on queue
                  Refer limits at https://wiki.ghpc.au.dk/limits.html

       M        : specify maximum amount of memory in MiB to reserve.
                  (optional) default = 5120 MiB(5 GiB)
                  Options:  Min = 512 MiB, Max = depends on CPU
                  Refer limits at https://wiki.ghpc.au.dk/limits.html

       R        : specify the release of DMU version 6 to use for this job.
                  (optional) default = latest production version of DMU.
                   Options:  ?????????????????????????

       JOBNAME  : DMU driver file name.
                  (Required)
                  "JOBNAME.DIR" must be in current directory.
rdmuai
rdmuai is a wrapper script that makes it easier to submit dmuai jobs in GHPC. The usage help of the wrapper is self-explanatory about the purpose of the script.
thami@console1:[~/dmut1] > rdmuai

rdmuai -   Command to submit a DMU batch job to run on GHPC

Usage: rdmuai [-w hh:mm:ss ] [-q Q] [-c C] [-m M] [-r R] JOBNAME

       hh:mm:ss : specify the wallclock time allowed for the job.
                  (optional) default = 12:00:00

       Q        : specify the batch queue to be used.
                  (optional) default = ghpc
                  Options:  ghpc or zen4 or nav or nav_zen4

                  NAV users are expected to use nav or nav_zen4 queue.

                  QGG users can submit jobs to: ghpc and zen4

       C        : specify number of CPU cores to reserve.
                  (optional) default = 1
                  Options:  Min = 1, Max = depends on queue
                  Refer limits at https://wiki.ghpc.au.dk/limits.html

       M        : specify maximum amount of memory in MiB to reserve.
                  (optional) default = 5120 MiB(5 GiB)
                  Options:  Min = 512 MiB, Max = depends on CPU
                  Refer limits at https://wiki.ghpc.au.dk/limits.html

       R        : specify the release of DMU version 6 to use for this job.
                  (optional) default = latest production version of DMU.
                   Options:  ?????????????????????????

       JOBNAME  : DMU driver file name.
                  (Required)
                  "JOBNAME.DIR" must be in current directory.
Examples
This page is soliciting your help!
The goal of this page is to provide example scripts that users of GHPC could easily resuse & adapt for their own needs.
If you dont find job scripts for your favorite tools/packages/tasks please consider writing them and talk to to you sysadmin about adding it here. I promise he is friendly :-) You would get special privileges in the cluster if you contribute to make the life of your colleagues a little easier.
Examples of what could be here in future:
How do I use DMU to do X?
How do I clean up X data to make it ready for tool Y?
SLURM cluster
The primary purpose of GHPC is to facilitate execution of a wide range of scientific applications pertaining to genetics and genomics on the dedicated servers managed by Aarhus University.
Slurm is an open source cluster workload scheduler and manager for large Linux clusters. SLURM performs three key functions :
- Allocate access to resources(compute nodes, cpus, memory) to users for some duration of time so they can perform their work.
- Provide a framework for starting, executing, and monitoring users' jobs.
- Arbitrate contention of resources by managing a queue of pending work.
Follow along the guide to understand how you can make use of Slurm to submit batch jobs, get interactive shell, check on jobs, cancel jobs etc.
Running batch jobs
The most common usecase of slurm to its users is to manage batch jobs.
What are batch jobs?
A batch job, usually in the form of a shell script requests computing resources and specifies the application(s) to launch on those resources along with any input data/options and output directives. As a workload manager, slurm is expected to fulfill the job’s request at the soonest available time constrained only by resource availability and user limits.
Anatomy of batch job aimed at SLURM
A batch job is a shell script that consists of two parts: resource requests and job steps.
Resource requests section involves specifying the number or amount of resources that are requested to be allocated for the execution of this job. Typical set of resources that need to be specified include number of CPU(cores), amount of memory/RAM, maximum time duration that the job is expected to run, where to write the results of the job etc.
Job steps section is essentially a bash script that describes the sequence of tasks to get user's work done.
Note:
(For better performance, run the main workload inside $TMPDIR whenever possible. The /usr/home filesystem is networked storage and is suitable for scripts, input files, and final results, but jobs that create many temporary or intermediate files should use local scratch storage under /scratch/$USER/$SLURM_JOBID. Copy only the required final results back to $SLURM_SUBMIT_DIR before the job finishes.)
An example of a batch would be as follows:
#!/bin/bash
#--------------------------------------------------------------------------#
#              Edit Job specifications                                     #
#--------------------------------------------------------------------------#
#SBATCH -p ghpc                    # Name of the queue
#SBATCH -N 1                       # Number of nodes (DO NOT CHANGE)
#SBATCH -n 1                       # Number of tasks
#SBATCH --cpus-per-task=1          # Number of CPU cores per task
#SBATCH --mem=1024                 # Memory in MiB (10 GiB = 10 * 1024 MiB)
#SBATCH -J template_job            # Name of the job
#SBATCH --output=slurm_%x_%A.out   # STDOUT
#SBATCH --error=slurm_%x_%A.err    # STDERR
#SBATCH -t 1:00:00                 # Job max time - Format = HH:MM:SS

#=========================================================================#
#         Create temporary directory in local scratch                      #
#=========================================================================#

TMPDIR=/scratch/$USER/$SLURM_JOBID
export TMPDIR
mkdir -p "$TMPDIR"

#=========================================================================#
#         Your job script                                                 #
#=========================================================================#

echo "Job started at $(date '+%d_%m_%y_%H_%M_%S')"
echo "Running on host: $(hostname)"
echo "Submit directory: $SLURM_SUBMIT_DIR"
echo "Scratch directory: $TMPDIR"

# Move to local scratch before running the workload
cd "$TMPDIR"

# Optional: copy input data from submit directory to scratch.
# Uncomment and edit this line if your job needs input files/folders.
# cp -r "$SLURM_SUBMIT_DIR"/input_data "$TMPDIR"/

echo "Step 1: Generating random numbers"

for i in {1..500000}; do
    echo $RANDOM >> SomeRandomNumbers.txt
done

echo "Step 2: Sorting random numbers"

sort -n SomeRandomNumbers.txt > SomeRandomNumbers.sorted.txt

#=========================================================================#
#         Copy final results back to submit directory                      #
#=========================================================================#

echo "Copying final results back to submit directory"

cp SomeRandomNumbers.sorted.txt "$SLURM_SUBMIT_DIR"/

echo "Job completed at $(date '+%d_%m_%y_%H_%M_%S')"

#=========================================================================#
#         Cleanup  DO NOT REMOVE OR CHANGE                                #
#=========================================================================#

cd "$SLURM_SUBMIT_DIR"
rm -rf "$TMPDIR"
Where,
ghpc is the name of the queue that this job is sent to. Refer to Job queues section of this guide to learn more about different queues and the associated hardware.
N denotes the number of nodes(dedicated physical servers) that are requested by this job. GHPC is not configured to run nodewise parallel jobs at the moment. Submitting jobs with N > 1 will make the jobs fail.
n denotes the number of CPU cores or hyperthreads requested by this job. The idea of Hyperthreads is discussed later in this page.
--mem denotes the amount of memory to be reserved for this job. If the job tries to use more than this amount of memory, Slurm will kill the job and write an error stating "out of memory". Knowing the amount of memory needed for a job can be tricky. It is discussed later in this page.
-J denotes the name of the job that is used for identification purposes in the output of several commands. It does not need to be unique, however it would ideally be human friendly to understand the purpose of the job.
--output specifies where to write the standard output that was recorded while executing this script. The echo statements in the script write to stdout and will be piped to the specified file.
--error specifies where to write the standard error similar to stdout.
-t specifies the maximum run time that this job is expected to hold on to the requested resources. If the job completes before the time limit is reached, then the resources will be freed automatically. If the job is not complete before the time limit is reached, slurm will kill the job as it is.
The lines with TMPDIR are creating a temporary directory on local storage for your job. As a thumb rule, leave those lines(and the two lines at the end with rm-rf command) as they are in all scripts you run.
Job queues
GHPC is busy running users' jobs and may not be able to execute incoming jobs right away due to resource availability or resource limits. In such a case, the job exists in a queue. In Slurm, a queue is associated with a specific set of dedicated or shared compute node resources. Queues are defined by your sysadmin and are configured with a specific set of limits such as job size, max run time limits, which users are allowed to run jobs in that queue etc.
Currently, the following queues are defined in GHPC
- ghpc
- zen4
- nav
- nav_zen4
Refer to hardware section of this guide to understand which queue is associated with which resources and what their limits are.
Understanding CPU at GHPC
In Slurm terminilogy, the processing units on nodes are the cores. However, with the advent of Simultaneous Multithreading (SMT) architectures, single cores can have multiple hardware threads (sometimes known as hyper-threads). The operating system running on servers sees the hardware threads as logical CPUs (while they are shared cores at the hardware level). For example, a server with an intel Xeon CPU containing 12 physical cores would be seen as having 24 CPUs by Linux if the HyperThreading feature is turned on. However, if HyperThreading is turned off, Linux would only see 12 CPUs.
This abstraction of logical CPUs impacts the level of memory bandwidth available to cores in purely memory bound scientific applications. However, in IO bound workloads, and some CPU bound workloads, the CPU waits are high enough anyway that having hardware threads could theoretically improve performance by upto 100%.
In order to improve the resource utilisation efficiency of GHPC cluster, the servers are configured with HyperThreading ON by default. This means that, if you have an application such as DMU that is known to be memory bandwidth bound, you would have to consciously choose double the number of cores as they expect to be made available to DMU to get the best performance.
References:
Understanding memory as a resource
Memory as a resource needs to be thought of in 2 dimensions. First, memory bandwidth: the amount of memory operations that can be performed per unit of time. Processors have memory channels through which they access memory and the bandwidth is typically shared by all the processor's cores or hyperthreads. Running several jobs on the same node, while all of them perform intensive memory read/write operations at the same time can be detrimental to the overall performance. However, it can be alleviated by requesting double the number of "cores" you need for the job thereby making sure you have plenty of memory bandwidth needed by the cores in action.
Second, sheer amount of addressable memory. Memory is often an expensive resources and needs to be used wisely to achieve the best results. With GHPC, the default allocation is 10.4 GiB of memory per core. However, not all jobs need or use that amount of memory, while some use more than that amount of memory per core. So, it is required for the jobs to specify approximately how much memory their job is expected to use. If the job tries to use more, then it will be killed by Slurm with an appropriate error message. On the other hand if a job requestes too much memory than needed, it is still counting towards the user's memory limits and their other jobs will wait in queue until these resources are relinquished to satisfy the limits. A good balance is to request for a reasonable amount of memory + 10% contingency.
SLURM environment variables
You can use Slurm environment variables in your job scripts to make re-usable job scripts.
$SLURM_JOB_ID ID of job allocation
$SLURM_SUBMIT_DIR Directory job where was submitted
$SLURM_JOB_NODELIST File containing allocated hostnames
$SLURM_NTASKS Total number of cores for job
Local disk storage for jobs
Eventhough networked storage is available across the entire cluster, it is important that users do NOT overload the central storage server with huge amounts of real-time IO including transient files and temporary results. Local storage is always faster for multiple accesses within the same job. If your job involves working with an input file several times and writing several transient files, copy the input files over to local storage at $TMPDIR and perform compute work on it only to copy over the results to the user's home directory as applicable at the end of the job.
In some cases where the input files are too big for the local node, the user may decide to run the job in such a way to read directly from networked storage. But this must be an informed decision rather than a blind guess.
The compute nodes have a minimum of 2 TiB of disk storage per node(16 or 32 cores). So, as long as your job does not go beyond 1 TiB of on disk data, and read/write several times, plan to use local storage. It is to be noted that disk storage is not a "consumable resource" in Slurm which means that a rogue job could potentially use up all of the disk storage thereby starving the rest of the jobs scheduled on that server and causing a serious inconvenience. So, practice caution, and ask your your sysadmin if you're in doubt.
The local storage is accessible at $TMPDIR
You can use the following pattern in your job scripts to make use of local storage.
# Create a temporary directory for the job in local storage
TMPDIR=/scratch/$USER/$SLURM_JOBID
export TMPDIR
mkdir -p $TMPDIR
cd $TMPDIR

# Copy the application binary if necessary to local storage
cp /path/to/software/executable .

# Copy input file(s) to local storage if necessary
cp /path/to/your/inputfiles .

# Execute the application with appropriate command

# Move the result files, logs, and any relevant data back to user's home directory.
mkdir -p $SLURM_SUBMIT_DIR/$SLURM_JOBID
cp output/files/needed $SLURM_SUBMIT_DIR/$SLURM_JOBID/

# Delete local storage on the way out as a clean up
cd $SLURM_SUBMIT_DIR
rm -rf /scratch/$USER/$SLURM_JOBID
Note: Use a modified version of the above example as necessary. For example, if your job involves several steps, you can delete the transient files from a completed step before proceeding to the next step.
Networked storage for jobs
GHPC uses a combination of an Isilon server and a NetApp filer as central storage that is accessible via NFS on all compute nodes and console servers. This means that your home directories are available on all compute nodes as they are on console[1,2] servers. However, please read the local storage section carefully and make use of it. Only copy the result files back to central networked storage.
Your home directories comes with storage quotas and are often limiting if you are working with huge datasets and result files. Contact your sysadmin by email if you need a space where to store huge amounts of research data.
So How do I submit my job for execution on SLURM?
Hopefully you have patiently read the prior sections on this page. After a good understanding of using resources, you're probably wondering how to actually submit your job to the cluster for execution.
If you have a job script like the one described in the example earlier, you are aware that all the resource requests are made within the job script. Hence it is very easy and straightforward to queue it up for execution with slurm.
asampath@console1:[~] > sbatch testslurm.sh
Submitted batch job 326
Where, testslurm.sh is the name of the job script file. You get a notification of the job ID, in this case - 326.
Follow along the guide to learn how to monitor running/completed jobs..
Checking on your job(s)
How do I monitor my jobs?
Now that you have submitted job(s), you can check the status of all the jobs in queue, using the alias myst
asampath@console1:[~] > myst
             JOBID PARTITION     NAME     USER ST       TIME  NODES  CPUS MIN_MEMORY NODELIST(REASON)
               326       nav template asampath  R       2:22      1     2        10G sky001.ghpc.au.dk
As you can see, the job with job ID - 326 that I submitted to the queue recently into the partition/queue nav, with the name template as username - asampath, has already started running, indicated by the state 'R' and has been running for 2 minutes and 22 seconds as of now, on 1 node, using 2 CPUs, with a memory limit of 10 GiBs and is being executed on a node identified by sky001.ghpc.au.dk.
On the other hand, if the cluster is busy serving a lot of jobs and your job is waiting for availability of resources it requested, you'd see the status as below.
asampath@console1:[~] > myst
             JOBID PARTITION     NAME     USER ST       TIME  NODES  CPUS MIN_MEMORY NODELIST(REASON)
               387       nav template asampath PD       0:00      1     1        10G (Resources)
               388       nav template asampath PD       0:00      1     1        10G (Priority)
Where, Resources reason indicates that the job is ready to run and is waiting for resources to be allocated, and Priority indicates that there are other jobs submitted before this job that needs to be scheduled before this one gets to execution or in other words, this job is waiting in queue.
Note: myst command is just a system-wide alias written by your sysadmin for the command - squeue -u $(whoami) -o "%.18i %.9P %.8j %.8u %.2t %.10M %.6D %.5C %.10m %R" so that it is easier to use.
Where is the output?
After a job completes (or sometimes during an execution of a job with several steps), you would want to see its output. With SLURM, you control where the output goes. Refer to your job script for the "--output" and "--error" sections to understand where the result files are written to.
In the example, we instructed SLURM to write a file "slurm_%A.out" in the home directory for stdout and "slurm_%A.err " for stderr.
asampath@console1:[~] > ls -alh slurm_326*
-rw-r--r--. 1 asampath qgg   0 Oct 28 15:10 slurm_326.err
-rw-r--r--. 1 asampath qgg 150 Oct 28 15:14 slurm_326.out
If you copied the results from execution of commands to some specific location in your job script, then check those locations for the results.
How can I see my completed jobs?
At times, you need to look at your completed jobs and check their resource usage details so as to model the job scripts of similar jobs. You can get the details of all your jobs using the sacct command. However, your sysadmin has made a system-wide aliases called sj and saj to help you find the details about any particular job or all jobs you have ever submitted.
Details of a particular job:
If you want to know the details of a particular job - identified by its job ID, you can use the sj command as shown below.
asampath@console1:[~] > sj 430
       JobID    JobName     Group  ReqCPUS   TotalCPU     ReqMem     MaxRSS     AveRSS  MaxDiskRead MaxDiskWrite    Elapsed
------------ ---------- --------- -------- ---------- ---------- ---------- ---------- ------------ ------------ ----------
430          template_+       qgg        1  00:05.742       10Gn                                                   00:10:00
430.batch         batch                  2  00:05.742       10Gn     20216K     20216K        0.04M        0.15M   00:10:00
Where,
the job requested 2 cpus, 10 GiB of memory, and used 20216 KiB (19.74 MiB) of memory at peak, wrote to disk at a rate of 0.15 MiB/s and ran for 10 minutes. This result indicates that if the job were to be resubmitted, it would be sufficient to request for just 1 cpu and 30 MiB of memory.
Details of a job while it is running:
If you need to see the status of a job that is currently running(to see how much memory it is using), you can use the alias - srj (status of a running job).
navtp@console1:~> srj 860
       JobID MaxRSSNode     AveRSS     MaxRSS  MaxVMSize     MinCPU
------------ ---------- ---------- ---------- ---------- ----------
860.0              sky1      2508K     69036K    534412K  00:02.000
Details of all the jobs you ever ran:
If you dont know the job ID, and would like to query all your jobs, you can use the out of saj as a source. Note: It can be exhaustively long if you have ran a lot of jobs.
asampath@console1:[~] > saj
       JobID    JobName     Group  ReqCPUS   TotalCPU     ReqMem     MaxRSS     AveRSS  MaxDiskRead MaxDiskWrite    Elapsed
------------ ---------- --------- -------- ---------- ---------- ---------- ---------- ------------ ------------ ----------
326          template_+       qgg        1  00:05.159       10Gn                                                   00:04:14
326.batch         batch                  2  00:05.159       10Gn     20576K     20576K        0.87M        0.60M   00:04:14
327          template_+       qgg        1  00:06.370       10Gn                                                   00:10:26
327.batch         batch                  2  00:06.370       10Gn     20216K     20216K        0.04M        0.20M   00:10:26
328          template_+       qgg        1  00:05.504       10Gn                                                   00:10:23
328.batch         batch                  2  00:05.504       10Gn     20216K     20216K        0.04M        0.18M   00:10:23
329          template_+       qgg        1  00:07.223       10Gn                                                   00:10:23
329.batch         batch                  2  00:07.223       10Gn     20216K     20216K        0.04M        0.17M   00:10:23
330          template_+       qgg        1  00:07.238       10Gn                                                   00:10:23
330.batch         batch                  2  00:07.238       10Gn     20216K     20216K        0.04M        0.17M   00:10:23

Trimmed for brevity
You can pipe its output to grep to filter information, or to less to page through this information.
Details of all the jobs you ran in the last 24 hours:
Another handy alias to list all jobs that were initiated in the last 24 hours (running, queued, completed, failed, cancelled). You can use the MaxRSS section to understand the peak memory usage of your job to model similar jobs in future.
asampath@console1:[~] > sajt
       JobID    JobName      User  Partition      State  ReqCPUS   TotalCPU     ReqMem     MaxRSS     AveRSS  MaxDiskRead MaxDiskWrite    Elapsed
------------ ---------- --------- ---------- ---------- -------- ---------- ---------- ---------- ---------- ------------ ------------ ----------
553          template_+  asampath        nav    RUNNING        1   00:00:00       10Gn                                                   00:00:32
554            hostname  asampath    ghpc_v1  COMPLETED        1  00:00.002       20Gc      1312K      1312K            0            0   00:00:00
555          template_+  asampath        nav    RUNNING        1   00:00:00       10Gn                                                   00:00:03
Running a single command in cluster
At times, you just want to run a command in the cluster, and you do not want to build a whole jobscript just for that. There's still a way. Slurm provides an option such that it can automatically build the wrapper script for your command itself based on options you supply to sbatch.
For example:
asampath@console1:[~] > sbatch -p nav -n 4 --wrap="sas hello.sas"
Submitted batch job 453
Where, the command - sas hello.sas is executed as a batch job on a compute node using the "nav" queue with a reservation of 4 cpus.
If you do not specify the requests for resources, the defaults will apply.
In GHPC,
default queue = ghpc
default number of cpus = 2
default amount of memory = 20 GiB
default stdout and stderr file = slurm-jobid.out in the directory where you run the command from.
default jobname = wrap
or you can specify all of the options yourself as in the example:
asampath@console1:[~] > sbatch -p nav -n 4 -J SAS_test --mem=1024 -o sas_test.out -e sas_test.err --wrap="sas hello.sas"
Submitted batch job 455
Interactive shell on cluster
As menioned in the Console section of this guide, console[1,2] servers are only a front end to submit jobs to the cluster and to occasionally build scripts and peek at results. If you need to do scientific work in an interactive fashion or have small amount of manual work, then you need to perform such work on a node in the cluster and NOT directly on console servers. To get a shell prompt on one of the cluster nodes, you can submit what is called as an interactive job, which will give you a command line prompt (instead of running a script) when the job runs.
The same arguments that you would use inside a job script applies to an interactive job as well. For example,
asampath@console1:[~] > srun -N1 -J testing_for_guide --pty bash
asampath@sky012:[~] >
Where,
You can see that I requested for 1 node and gave a job label of "testing_for_guide" so that I can identify this session later, and asked to be dropped into a bash session. The result of such request was the change of prompt, in this case to sky012 which is a cluster node.
If you open another session to console[1,2] and check the status of the job queue, you'd see.
asampath@console1:[~] > myst
             JOBID PARTITION     NAME     USER ST       TIME  NODES  CPUS MIN_MEMORY NODELIST(REASON)
               446   ghpc testing_ asampath  R       1:22      1     2        20G sky012.ghpc.au.dk
that shows that interactive sessions are also treated like jobs in SLURM just that you're working on it live.
If you type exit and hit return, you give up the interactive session and the job ends according to SLURM.
A more sophisticated example of an interactive job would be
asampath@console1:[~] > srun -N 1 -n 4 --mem=1024 -t 1:00:00 -J testing_for_guide --pty bash
asampath@sky012:[~] >
Where, I requested for 1 node, 4 cpus, 1024 MiB of memory, max time of 1 hour, and a label of "testing_for_guide", and to be dropped into a bash shell.
If you looked at the status of this job in queue, you'd see the resources allocated as expected.
asampath@console1:[~] > myst
             JOBID PARTITION     NAME     USER ST       TIME  NODES  CPUS MIN_MEMORY NODELIST(REASON)
               449   ghpc testing_ asampath  R       0:04      1     4         1G sky012.ghpc.au.dk
ishell
ishell was later introduced to simplify the process for users to run interactive jobs on the GHPC. It provides a fast and straightforward way to launch an interactive shell session on one of the compute nodes. Avoid using console servers for tasks like running quick scripts or performing activities unrelated to managing SLURM jobs. By running ishell, you are instantly connected to a compute node with access to 1 CPU core and 2 GiB of memory. In the background, ishell runs the following command: srun -p ghpc --mem=2G --pty bash. It automatically selects the appropriate queue, whether ghpc or nav, based on whether you're a QGG or nav user.
thami@console1:[~] > ishell
srun: job 576839 queued and waiting for resources
srun: job 576839 has been allocated resources
(base) thami@sky006:~$
thami@console1:[~] > myst
             JOBID PARTITION     NAME     USER ST     TIME_LIMIT       TIME  NODES  CPUS MIN_MEMORY NODELIST(REASON)
            576839      ghpc     bash    thami  R       12:00:00       1:04      1     1         2G sky006
Interactive R or Python or Julia session on cluster node
R
Sometimes, you just need an interactive session of R to get your work done without submitting a cluster batch job. If you run R directly on console[1,2] and use a lot of memory or CPU, you are making the console server slow for other users who just want to submit jobs to the cluster. Additionally your (usually nice) sysadmin will yell at you for causing headache to other users for your convenience. So, the solution is to get an interactive R session on one of the cluster nodes.
As a side benefit, you are now running R on a server dedicated for HPC use that is much faster than console[1,2] and has vast resources than console.
But, how?
It is as easy as running srun --pty R. <<<- This will only get you 1 CPU core, and 10GiB of memory on ghpc queue with a time limit of 12 hours. It is sufficient for most usecases. If you would need more, read further to learn about how to customise your request.
thami@console1:[~] > srun --pty R

R version 4.0.3 (2020-10-10) -- "Bunny-Wunnies Freak Out"
Copyright (C) 2020 The R Foundation for Statistical Computing
Platform: x86_64-pc-linux-gnu (64-bit)

R is free software and comes with ABSOLUTELY NO WARRANTY.
You are welcome to redistribute it under certain conditions.
Type 'license()' or 'licence()' for distribution details.

  Natural language support but running in an English locale

R is a collaborative project with many contributors.
Type 'contributors()' for more information and
'citation()' on how to cite R or R packages in publications.

Type 'demo()' for some demos, 'help()' for on-line help, or
'help.start()' for an HTML browser interface to help.
Type 'q()' to quit R.


> Sys.info()
                              sysname                  release
                              "Linux"         "6.1.0-13-amd64"
                              version                  nodename
"#1 SMP  Debian 6.1.55-1(2023-09-29)"         "cas8.ghpc.au.dk"
                              machine                  login
                             "x86_64"              "unknown"
                              user                     effective_user
                           "thami"                            "thami"
> q()
Save workspace image? [y/n/c]: n
thami@console1:[~] >
Psssh, I'm an R expert, and I want more resources than 2 CPUs and 10GB of memory..
Internally your interactive session gets submitted as a job to the Slurm cluster, and giving you resources from the same limits you're already bound to. You can customise the srun command to specify your resource requirments exactly like you would if you were running SBATCH.
For example,
thami@console1:[~] > srun -N 1 -n 4 --mem=40g -t 24:00:00 -J testing_R_for_science --pty R

R version 4.0.3 (2020-10-10) -- "Bunny-Wunnies Freak Out"
Copyright (C) 2020 The R Foundation for Statistical Computing
Platform: x86_64-pc-linux-gnu (64-bit)

R is free software and comes with ABSOLUTELY NO WARRANTY.
You are welcome to redistribute it under certain conditions.
Type 'license()' or 'licence()' for distribution details.

  Natural language support but running in an English locale

R is a collaborative project with many contributors.
Type 'contributors()' for more information and
'citation()' on how to cite R or R packages in publications.

Type 'demo()' for some demos, 'help()' for on-line help, or
'help.start()' for an HTML browser interface to help.
Type 'q()' to quit R.


>
Where, I requested for 1 node, 4 cpus, 40 GiB of memory, max time of 24 hours, and a label of "testing_R_for_science", and to be dropped into a R session directly.
To understand your request, if you open another SSH session, and use the myst command to see your own jobs, you will see as below.
thami@console1:[~] > myst
            JOBID  PARTITION     NAME     USER   ST     TIME_LIMIT       TIME  NODES  CPUS MIN_MEMORY NODELIST(REASON)
            570862   ghpc    testing_     thami   R     1-00:00:00       0:10      1     4        40G sky012.ghpc.au.dk
showing that Slurm treated your Interactive session as yet another job, and shows how much resources you reserved for it.
Python and Julia
The same technique used for R in the above section is useful for getting interactive sessions of other languages as well. For example:
thami@console1:[~] > srun --pty julia
               _
   _       _ _(_)_     |  Documentation: https://docs.julialang.org
  (_)     | (_) (_)    |
   _ _   _| |_  __ _   |  Type "?" for help, "]?" for Pkg help.
  | | | | | | |/ _` |  |
  | | |_| | | | (_| |  |  Version 1.7.3 (2022-05-06)
 _/ |\__'_|_|_|\__'_|  |  Official https://julialang.org/ release
|__/                   |

julia>
thami@console1:[~] > srun --pty python3
Python 3.10.10 (main, Mar 21 2023, 18:45:11) [GCC 11.2.0] on linux
Type "help", "copyright", "credits" or "license" for more information.
>>>
SAS
Interactively running SAS means you are running in "line-mode" according to SAS terminology. Reference: http://support.sas.com/documentation/cdl/en/hostunx/61879/HTML/default/a002460896.htm
Use the following command to get such an interactive session.
srun --pty sas -nodms
Example:
thami@console1:[~] > srun --pty sas -nodms
NOTE: Copyright (c) 2002-2012 by SAS Institute Inc., Cary, NC, USA.
NOTE: SAS (r) Proprietary Software 9.4 (TS1M0)
      Licensed to CAMPUS - AARHUS UNI, Site 50800154.
NOTE: This session is executing on the Linux 6.1.0-13-amd64 (LIN X64)
      platform.


NOTE: Updated analytical products:

      SAS/STAT 12.3 (maintenance)
      SAS/ETS 12.3 (maintenance)
      SAS/OR 12.3 (maintenance)
      SAS/IML 12.3 (maintenance)
      SAS/QC 12.3 (maintenance)

NOTE: Additional host information:

 Linux LIN X64 6.1.0-13-amd64 #1 SMP PREEMPT_DYNAMIC Debian 6.1.55-1
      (2023-09-29) x86_64 Unrecognized Linux Distribution

You are running SAS 9. Some SAS 8 files will be automatically converted
by the V9 engine; others are incompatible.  Please see
http://support.sas.com/rnd/migration/planning/platform/64bit.html

PROC MIGRATE will preserve current SAS file attributes and is
recommended for converting all your SAS libraries from any
SAS 8 release to SAS 9.  For details and examples, please see
http://support.sas.com/rnd/migration/index.html


This message is contained in the SAS news file, and is presented upon
initialization.  Edit the file "news" in the "misc/base" directory to
display site-specific news and information in the program log.
The command line option "-nonews" will prevent this display.


NOTE: SAS initialization used:
      real time           0.14 seconds
      cpu time            0.02 seconds

 1?
Other SLURM tasks
Displaying resources available in the cluster
When running jobs, it might become relevant to check what resources are available in teh cluster and request resources according to availability. Your sysadmin created an alias to easily get a summary of resources available in GHPC - ghpcinfo. It aliases the slurm command sinfo to provide information in an easy format.
# ghpcinfo
PARTITION    AVAIL TIMELIMIT    CPUS(A/I/O/T)  S:C:T    FREE_MEM       NODELIST
zen4         up    45-12:00:00  460/692/0/1152 2:32:2   49704-1118296  epyc[01-09]
nav_zen4     up    45-12:00:00  14/242/0/256   2:32:2   1350332-152040 epyc[10-11]
ghpc         up    45-12:00:00  592/1008/0/160 2:8+:2   49704-1118296  cas[1-8],epyc[01-09],sky[006-008,011-013]
ghpc_short   up    1-01:00:00   8/24/0/32      2:8:2    357323         sky008
nav          up    45-12:00:00  14/434/0/448   2:8+:2   302291-1520405 epyc[10-11],sky[001-005,014]
Where,
there are four queues namely - ghpc(default), zen4, ghpc_short, nav and nav_zen4.
CPUS(A/I/O/T) stands for Nodes (Active/Idle/Other/Total).
S:C:T stands for sockets:CPUs:Threads. 2:32:2 indicates the server has 2 sockets, each with 32 core CPUs and each core has 2 hyperthreads, totaling as 128 logical CPUs per server.
Canceling a job
Sometimes, you need to cancel a job that was submitted by mistake or with wrong specs etc.
Check your jobs using myst alias and find the job number that you want to cancel. Then, cancel it using scancelcommand.
asampath@console1:[~] > myst
             JOBID PARTITION     NAME     USER ST       TIME  NODES  CPUS MIN_MEMORY NODELIST(REASON)
               556       nav template asampath  R       0:07      1     2        10G c09b03.ghpc.au.dk
               557       nav template asampath  R       0:04      1     2        10G c09b03.ghpc.au.dk
asampath@console1:[~] > scancel 556
asampath@console1:[~] > myst
             JOBID PARTITION     NAME     USER ST       TIME  NODES  CPUS MIN_MEMORY NODELIST(REASON)
               557       nav template asampath  R       0:11      1     2        10G c09b03.ghpc.au.dk
Modifying Time limit of a running/pending job
Slurm does not allow users to increase the time limits of running jobs. If you submitted a job with a run time of x hours, and realize that perhaps it might need x+2 hours to finish, you can email your sysadmin requesting to increase the time limit of the job at any time. Do not expect immediate response. But, if you're lucky and your sysadmin read your email at that time, it can be done easily.
when you send an email, specify the job and time limit in text form, and do NOT send screenshots.
Moving a job to the top of your queue
At times, you may have a need to make a job run with higher priority than the rest of your jobs already waiting in queue. You can move any job to the top of your queue using..
scontrol top <jobid>
Resubmit a job
If you'd like to resubmit a job with same parameters,
scontrol requeue <jobid>
SLURM FAQ
1. Exporting environment variables to a script
At times, you want to use your script as a template with an environment variable and supply that varaible's value in job submission time. This would make it easy to use the same script and submit it n times just changing the environment variable for each submission.
It is possible to do this using the --export option of the sbatch command.
Importantly, if you would like to keep the cluster wide user environment variables(E.g java -> /opt/ghpc/jdk-current/bin/java), then use the syntax as --export=ALL,whatever so that all default environment variables are retained.
Example,
sbatch --export ALL,bam=1_10.bam bam_processor.sh
and you use the variable $bam in your script - bam_processor.sh
2. Representing job dependancies in Slurm
Often times, you have a pipeline of jobs to do. Example, you need to complete job A before starting job B. Specifying such dependancies to Slurm is easy. sbatch command can be used to delare dependencies using the syntax below.
sbatch --dependency=<type:job_id[:job_id][,type:job_id[:job_id]]> ...
Dependency types:
| Syntax | Description |
|---|---|
| after:jobid[:jobid...] | Job can begin after the specified jobs have started |
| afterany:jobid[:jobid...] | Job can begin after the specified jobs have terminated |
| afternotok:jobid[:jobid...] | Job can begin after the specified jobs have failed |
| afterok:jobid[:jobid...] | Job can begin after the specified jobs have run to completion with an exit code of zero |
A simple example of job dependency, stating that this job needs to be started only after successful completion of a certain prior job is below.
sbatch --dependency=afterok:11254323 job2.sh
Where, 11254323 is the job ID of the job which needs to be completed successfully prior to this job starting to run.
Using this technique, one can build pipelines of jobs. Bash is the best tool for this task.
#! /bin/bash

# first job - no dependencies
jid1=$(sbatch  --mem=12g job1.sh)

# multiple jobs can depend on a single job
jid2=$(sbatch  --dependency=afterok:$jid1 --mem=20g job2.sh)
jid3=$(sbatch  --dependency=afterok:$jid1 --mem=20g job3.sh)

# a single job can depend on multiple jobs
jid4=$(sbatch  --dependency=afterok:$jid2:$jid3 job4.sh)
3. How do I get email notifications for Slurm jobs?
So, you have an important job that you want to be notified about when it is complete. Follow the simple steps below to send yourself an email from within your job.
mailghpc -s 'subject of my email goes here' -t 'myemailaddress@email.com' 'Body of my email - write whatever text you need here'
You can place such a command above with modified subject, to address, and body message anywhere in your job script to get appropriate notification.
For example, place this command at the beginning of the job script to know when your job has started. Place it at the end of the job script and you can be notified when the job script has finished.
You can also get crafty and compose the subject and body fields of this command within your bash script to get relevant notifications wherever in your job script.
Resource limits
| limit / Queue > | GHPC | ZEN4 | nav_zen4 | nav |
|---|---|---|---|---|
| Max number of CPU cores that can be requested by a job | 32 | 128 | 128 | 32 |
| Default number of CPU cores assigned to a job if not specified by user | 2 | 2 | 2 | 2 |
| Max amount of memory that can be requested by a job | 740 GiB | 1.5 TiB | 1.5 TiB | 385 GiB |
| Default amount of memory assigned to a job if not specified by user | 11.7 GiB/core | 11.75 GiB/core | 11.7 GiB/core | 11.75 GiB/core |
Fair usage limits:
As resourceful as the cluster is, it is unfair for a single user to overwhelm the resource pool att he cost of other users's requests. Hence fair usage limits are put in place. The following limits apply to all users by default. If you reach this limit your further jobs will be made to wait in queue until your prior jobs complete, leaving their occupied resources back to the pool.
Maximum # of CPU cores a user can utilise as part of their running jobs = 72
Maximum amount of memory a user can reserve at any point in time = 768 GiB
Maximum number of jobs a user can have (running + pending) in the system at a time = 144
What if a user hits one of the limits above?
Their jobs will be queued and will get a chance to run only after their currently running jobs relinquish the resources so that the limits could still be satisfied.
For example, if a job is made to wait because a user's memory limit, it would show up like below.
asampath@c07b12:[~] > myst
             JOBID PARTITION     NAME     USER ST     TIME_LIMIT       TIME  NODES  CPUS MIN_MEMORY NODELIST(REASON)
              3945   ghpc        bash asampath PD       12:00:00       0:00      1     1       220G (QOSMaxMemoryPerUser)
How do I know if I hit any of the limits?
myst and squeue commands will clearly state why your jobs are pending and what limits they are waiting to satisfy.
What if I need an exception?
Write an email to your sysadmin and give a convincing reason why you need extra resources.
PBS to SLURM transition
University of Southern California already compiled an excellent list of cheatsheets and resources for converting PBS terminology to Slurm.
You can read it here: https://hpcc.usc.edu/support/documentation/pbs-to-slurm/
A short version of it, strictly pertaining to GHPC is below.
Key differences
Job runs from where you submitted the job and not the user's home directory...
Commands
| PBS command | Slurm command | Meaning |
|---|---|---|
| qsub job-script.sh | sbatch job-script.sh | submit job-script.sh to the queue |
| qsub -I | srun -N1 --pty bash | Get an interactive shell on a cluster node |
| myst | myst | status of my jobs in all queues |
| navst | navst | Status of all jobs in NAV queue |
| qstat -f | sj | all details about a job |
| N/A | saj | Status of all my jobs |
| N/A | sajt | Status of all my jobs in last 24 hours |
| qdel | scancel | cancel a job |
| pbsnodes -a | ghpcinfo | Status of all nodes in entire cluster |
Environment variables
| PBS | Slurm | Meaning |
|---|---|---|
| $PBS_JOBID | $SLURM_JOB_ID | job id for use within scripts |
| $PBS_O_WORKDIR | $SLURM_SUBMIT_DIR | Directory where the job was submitted from |
| $PBS_O_HOST | $SLURM_SUBMIT_HOST | Hostname where job was submitted from |
Automate conversion of job scripts from PBS to Slurm
An easy way to swap these environment variables in your current job scripts? You can use sed.
sed -i -e 's/$PBS_JOBID/$SLURM_JOB_ID/g' -e 's/$PBS_O_WORKDIR/$SLURM_SUBMIT_DIR/g' <jobscriptfilename.sh>
Singularity containers on GHPC
GHPC provides Singularity (singularity-ce 4.2.1) for running containerized workflows on compute nodes.
Important policy: run images from /scratch
On GHPC, container images must be executed from /scratch.
This means singularity exec /run/shell must reference an image file located under /scratch/..
Allowed:
singularity exec /scratch/$USER/containers/myimage.sif <command>
Not allowed:
singularity exec $HOME/myimage.sif <command>
You can pull images yourself. The recommended workflow is:
- Start a job (interactive or batch)
- Pull the image into
/scratch(job-local scratch is recommended) - Run from
/scratch
Interactive example (srun)
Request an interactive session on a compute node:
srun -N 1 -n 1 --mem=1024 -t 1:00:00 -J my_ishell --pty bash
Pull a small test image to /scratch and run it:
mkdir -p /scratch/$USER/containers
cd /scratch/$USER/containers

singularity pull alpine_latest.sif docker://alpine:latest
singularity exec /scratch/$USER/containers/alpine_latest.sif cat /etc/os-release
Batch job template (recommended)
This SLURM template:
- Creates a job-local directory in
/scratch/$USER/$SLURM_JOBID - Pulls the image into that directory
- Runs the workload inside the container
- Cleans up at the end
Save as singularity_template.slurm:
#!/bin/bash
#--------------------------------------------------------------------------#
#              Edit Job specifications                                     #
#--------------------------------------------------------------------------#
#SBATCH -p ghpc                    # Name of the queue
#SBATCH -N 1                       # Number of nodes(DO NOT CHANGE)
#SBATCH -n 1                       # Number of CPU cores
#SBATCH --mem=1024                 # Memory in MiB(10 GiB = 10 * 1024 MiB)
#SBATCH -J singularity_template    # Name of the job
#SBATCH --output=slurm_%x_%A.out   # STDOUT
#SBATCH --error=slurm_%x_%A.err    # STDERR
#SBATCH -t 1:00:00                 # Job max time

# Create a temporary directory for the job in local storage - DO NOT CHANGE #
TMPDIR=/scratch/$USER/$SLURM_JOBID
export TMPDIR
mkdir -p "$TMPDIR"

#=========================================================================#
#         Singularity setup (GHPC policy: run images from /scratch)        #
#=========================================================================#

IMG_DIR="$TMPDIR/containers"
IMG="$IMG_DIR/alpine_latest.sif"
mkdir -p "$IMG_DIR"

# Keep Singularity cache/tmp inside job scratch (faster, avoids $HOME)
export SINGULARITY_TMPDIR="$TMPDIR/sing_tmp"
export SINGULARITY_CACHEDIR="$TMPDIR/sing_cache"
mkdir -p "$SINGULARITY_TMPDIR" "$SINGULARITY_CACHEDIR"

echo "Job started at $(date '+%d_%m_%y_%H_%M_%S') on $(hostname)"
echo "TMPDIR=$TMPDIR"

# Pull container to /scratch (allowed) and run it from /scratch (required)
singularity pull "$IMG" docker://alpine:latest
singularity exec "$IMG" cat /etc/os-release
singularity exec "$IMG" id

#=========================================================================#
#         Your job script (example workload inside container)              #
#=========================================================================#
echo "Step 1: Generating and sorting random numbers (inside container)"
singularity exec --bind "$TMPDIR:/work" "$IMG" sh -c '
  cd /work
  for i in $(seq 1 500000); do
    echo $RANDOM >> SomeRandomNumbers.txt
  done
  sort -n SomeRandomNumbers.txt > SomeRandomNumbers_sorted.txt
  echo "Done. Output files:"
  ls -lh SomeRandomNumbers*.txt | head
'

echo "Job completed at $(date '+%d_%m_%y_%H_%M_%S')"

#=========================================================================#
#         Cleanup  DO NOT REMOVE OR CHANGE                                #
#=========================================================================#
cd "$SLURM_SUBMIT_DIR"
rm -rf "/scratch/$USER/$SLURM_JOBID"
Submit it:
sbatch singularity_template.slurm
Notes
- Prefer running container workloads in batch jobs (sbatch) or interactive sessions (
srun), not on login/console nodes. - Use
--bindto mount your job directory into the container (example above mounts$TMPDIRto/work). - If you have questions about MPI, GPUs, or performance tuning, include your job script and error output when requesting support.
GPU Compute Resources
GHPC provides GPU resources through the Slurm partition:
ghpc_gpu
The GPU partition can be used for workloads such as machine learning, deep learning, PyTorch, TensorFlow, CUDA-based applications, and other GPU-accelerated jobs.
Available GPU Nodes
The ghpc_gpu partition currently contains the following GPU nodes:
| Node | GPU configuration | GPU memory | System memory |
|---|---|---|---|
gpu01 | 1 × NVIDIA L40S | 48 GB | 185 GB |
gpu02 | 2 × NVIDIA L40S | 48 GB per GPU | 383 GB |
Users normally should not request a specific GPU node. Slurm will automatically select a suitable available GPU node based on the requested GPU and memory resources.
For example, use:
#SBATCH -p ghpc_gpu
#SBATCH --gres=gpu:1
Avoid forcing a node unless there is a specific reason:
#SBATCH --nodelist=gpu01
or:
#SBATCH --nodelist=gpu02
Requesting a GPU Job
To request one GPU in a batch job:
#SBATCH -p ghpc_gpu
#SBATCH --gres=gpu:1
To request two GPUs, for example on gpu02:
#SBATCH -p ghpc_gpu
#SBATCH --gres=gpu:2
A job requesting two GPUs can only run on a node with at least two available GPUs.
Important: GPU Visibility in Slurm Jobs
When a job requests a GPU, Slurm controls which GPU devices are visible inside the job.
For example:
#SBATCH --gres=gpu:1
will expose only one GPU to the job, even if the physical node has more GPUs.
Inside the job, you can check this with:
echo $CUDA_VISIBLE_DEVICES
For a one-GPU job, this may show:
0
For a two-GPU job, this may show:
0,1
This is expected behaviour.
Interactive GPU Session
For testing or debugging, users can start an interactive GPU session:
srun -p ghpc_gpu --gres=gpu:1 --mem=8G --pty bash
Then check which node was assigned:
hostname
Check GPU visibility:
echo $CUDA_VISIBLE_DEVICES
nvidia-smi
Exit the session when finished:
exit
To request two GPUs interactively:
srun -p ghpc_gpu --gres=gpu:2 --mem=16G --pty bash
Recommended GPU Batch Job Template
Below is a recommended Slurm batch script for GPU jobs.
#!/bin/bash
#--------------------------------------------------------------------------#
# Job Specifications for GPU Usage
#--------------------------------------------------------------------------#
#SBATCH -p ghpc_gpu                    # GPU partition
#SBATCH -N 1                           # Number of nodes
#SBATCH -n 1                           # Number of tasks
#SBATCH --mem=8192                     # Memory in MiB, e.g. 8192 = 8 GB
#SBATCH --gres=gpu:1                   # Request 1 GPU
#SBATCH -J gpu_job                     # Job name
#SBATCH --output=slurm_%x_%A.out       # STDOUT
#SBATCH --error=slurm_%x_%A.err        # STDERR
#SBATCH -t 1:00:00                     # Max runtime: HH:MM:SS

set -euo pipefail

#--------------------------------------------------------------------------#
# Temporary directory
#--------------------------------------------------------------------------#
TMPDIR=/scratch/$USER/$SLURM_JOBID
export TMPDIR
mkdir -p "$TMPDIR"

#--------------------------------------------------------------------------#
# Activate Python environment
#--------------------------------------------------------------------------#
# Example shared Python environment:
source /usr/lib/python3.11/venv/bin/activate

# If you use your own Conda environment, use something like:
# source /path/to/miniconda3/etc/profile.d/conda.sh
# conda activate my_environment

#--------------------------------------------------------------------------#
# GPU and environment debugging information
#--------------------------------------------------------------------------#
echo "Running on node: $(hostname)"
echo "SLURM job ID: $SLURM_JOBID"
echo "SLURM node list: $SLURM_JOB_NODELIST"
echo "TMPDIR: $TMPDIR"
echo "Python: $(which python)"
echo "Python version: $(python --version)"
echo "CUDA_VISIBLE_DEVICES=$CUDA_VISIBLE_DEVICES"
echo "SLURM_JOB_GPUS=$SLURM_JOB_GPUS"
echo "SLURM_STEP_GPUS=$SLURM_STEP_GPUS"

python - <<'PY'
import os
import torch

print("CUDA_VISIBLE_DEVICES:", os.environ.get("CUDA_VISIBLE_DEVICES"))
print("Torch version:", torch.__version__)
print("Torch CUDA:", torch.version.cuda)
print("CUDA available:", torch.cuda.is_available())
print("GPU count:", torch.cuda.device_count())

if torch.cuda.is_available():
    print("GPU name:", torch.cuda.get_device_name(0))
PY

#--------------------------------------------------------------------------#
# Run GPU workload
#--------------------------------------------------------------------------#
# Recommended: start the Python workload through srun
srun python my_gpu_script.py

#--------------------------------------------------------------------------#
# Cleanup
#--------------------------------------------------------------------------#
cd "$SLURM_SUBMIT_DIR"
rm -rf "$TMPDIR"
Why Use srun Inside a GPU Batch Job?
In GPU batch jobs, it is recommended to start the actual workload using srun, for example:
srun python my_gpu_script.py
instead of:
python my_gpu_script.py
Using srun helps ensure that Slurm correctly applies the allocated job resources, including GPU-related environment variables.
PyTorch GPU Test
To check whether PyTorch can see the GPU inside a Slurm job:
python - <<'PY'
import os
import torch

print("CUDA_VISIBLE_DEVICES:", os.environ.get("CUDA_VISIBLE_DEVICES"))
print("Torch version:", torch.__version__)
print("Torch CUDA:", torch.version.cuda)
print("CUDA available:", torch.cuda.is_available())
print("GPU count:", torch.cuda.device_count())

if torch.cuda.is_available():
    print("GPU name:", torch.cuda.get_device_name(0))
PY
Expected output should include:
CUDA available: True
GPU count: 1
GPU name: NVIDIA L40S
For a two-GPU job, GPU count should show:
GPU count: 2
Common Reasons PyTorch Does Not Use the GPU
If nvidia-smi shows no GPU process, or if PyTorch reports:
torch.cuda.is_available()
False
check the following:
-
The job was submitted with a GPU request:
#SBATCH --gres=gpu:1 -
The Python workload is started with
srun:srun python my_gpu_script.py -
The correct Python or Conda environment is activated.
-
The installed PyTorch version supports CUDA.
-
The Python code explicitly moves the model and data to CUDA, for example:
import torch

device = torch.device("cuda" if torch.cuda.is_available() else "cpu")
model = model.to(device)
Input tensors also need to be moved to the GPU, for example:
x = x.to(device)
y = y.to(device)
Temporary Directory on /scratch
GPU jobs should use local scratch space for temporary files:
TMPDIR=/scratch/$USER/$SLURM_JOBID
export TMPDIR
mkdir -p "$TMPDIR"
At the end of the job, remove the temporary directory:
cd "$SLURM_SUBMIT_DIR"
rm -rf "$TMPDIR"
Do not store important long-term data only in /scratch. Copy final results back to your project or home directory before the job finishes.
Example: One-GPU PyTorch Job
#!/bin/bash
#SBATCH -p ghpc_gpu
#SBATCH -N 1
#SBATCH -n 1
#SBATCH --mem=16G
#SBATCH --gres=gpu:1
#SBATCH -J pytorch_test
#SBATCH --output=slurm_%x_%A.out
#SBATCH --error=slurm_%x_%A.err
#SBATCH -t 1:00:00

set -euo pipefail

TMPDIR=/scratch/$USER/$SLURM_JOBID
export TMPDIR
mkdir -p "$TMPDIR"

source /usr/lib/python3.11/venv/bin/activate

echo "Running on node: $(hostname)"
echo "CUDA_VISIBLE_DEVICES=$CUDA_VISIBLE_DEVICES"

srun python - <<'PY'
import torch
import os

print("CUDA_VISIBLE_DEVICES:", os.environ.get("CUDA_VISIBLE_DEVICES"))
print("CUDA available:", torch.cuda.is_available())
print("GPU count:", torch.cuda.device_count())

if torch.cuda.is_available():
    print("GPU:", torch.cuda.get_device_name(0))
PY

cd "$SLURM_SUBMIT_DIR"
rm -rf "$TMPDIR"
Example: Two-GPU Job
To request both GPUs on a suitable node:
#!/bin/bash
#SBATCH -p ghpc_gpu
#SBATCH -N 1
#SBATCH -n 1
#SBATCH --mem=32G
#SBATCH --gres=gpu:2
#SBATCH -J two_gpu_test
#SBATCH --output=slurm_%x_%A.out
#SBATCH --error=slurm_%x_%A.err
#SBATCH -t 1:00:00

set -euo pipefail

TMPDIR=/scratch/$USER/$SLURM_JOBID
export TMPDIR
mkdir -p "$TMPDIR"

source /usr/lib/python3.11/venv/bin/activate

echo "Running on node: $(hostname)"
echo "CUDA_VISIBLE_DEVICES=$CUDA_VISIBLE_DEVICES"

srun python - <<'PY'
import torch
import os

print("CUDA_VISIBLE_DEVICES:", os.environ.get("CUDA_VISIBLE_DEVICES"))
print("CUDA available:", torch.cuda.is_available())
print("GPU count:", torch.cuda.device_count())

for i in range(torch.cuda.device_count()):
    print(i, torch.cuda.get_device_name(i))
PY

cd "$SLURM_SUBMIT_DIR"
rm -rf "$TMPDIR"
Checking Job Status
Show GPU jobs:
squeue -p ghpc_gpu
Show GPU nodes:
sinfo -N -p ghpc_gpu -o "%N %P %T %c %m %e %G"
Show detailed information about a job:
scontrol show job <JOBID>
Show detailed information about a GPU node:
scontrol show node gpu01
scontrol show node gpu02
Summary
Use the GPU partition with:
#SBATCH -p ghpc_gpu
#SBATCH --gres=gpu:1
For most jobs, do not force a specific GPU node. Let Slurm choose the appropriate node automatically.
For GPU batch jobs, start the Python workload with:
srun python my_gpu_script.py
Use the CUDA/PyTorch test commands above to verify that the GPU is visible inside the job.
Source version control with Git

-
Git is a popular distributed version control system.
-
Git records changes to your source code over time allowing you to recall specific versions later.
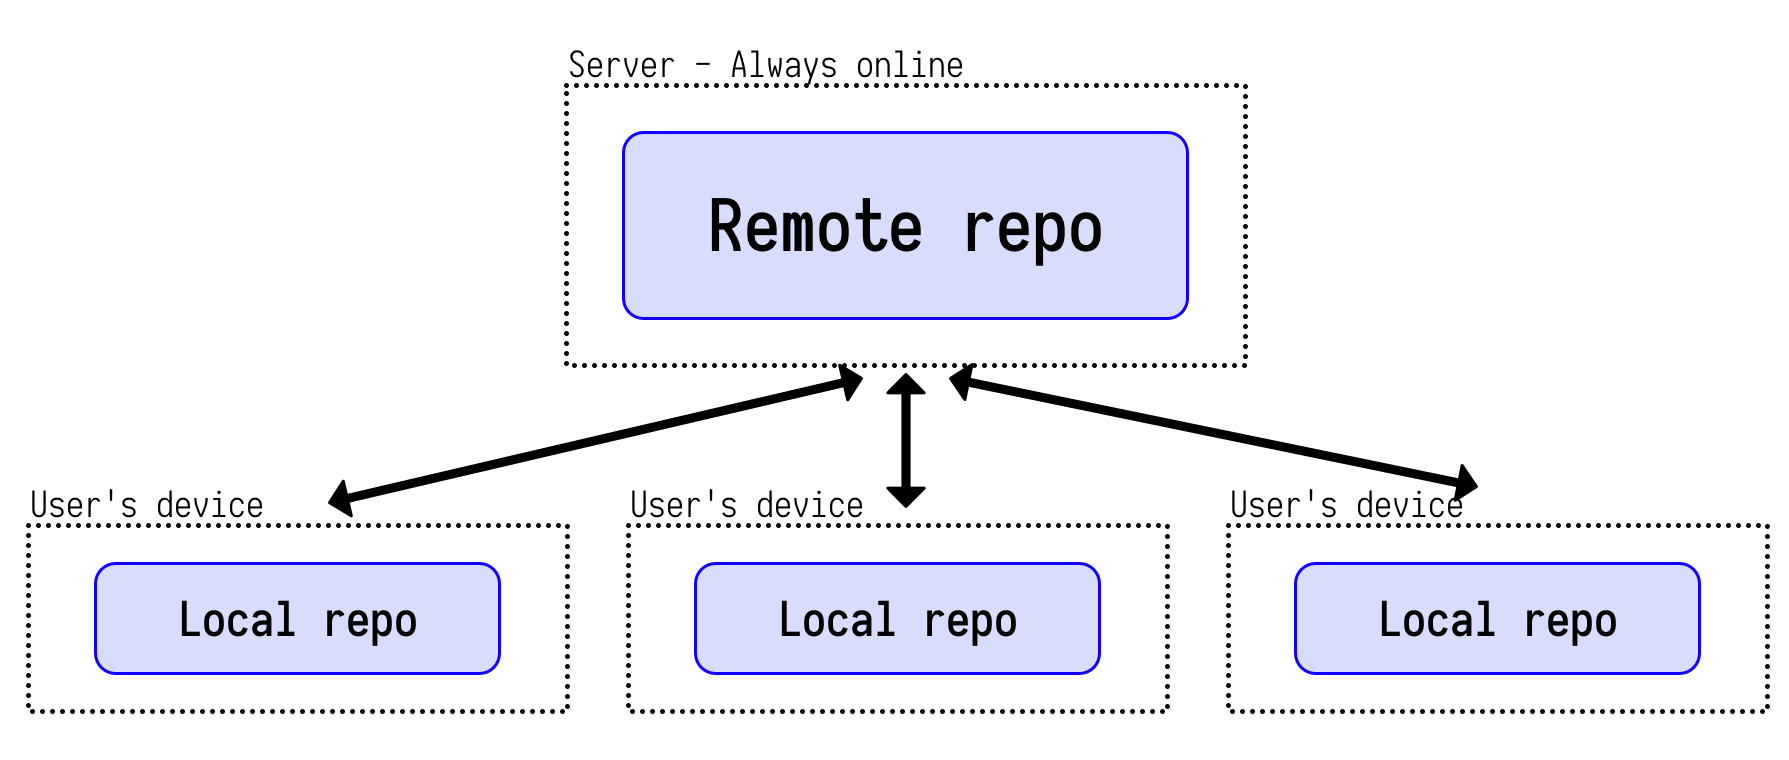
-
Users work on their local copies of the source code.
-
A repo is just a directory of files. Deleting a repo = simply deleting that directory.
Creating a local repository
- Copying an existing repo to a local device is called
cloneing,
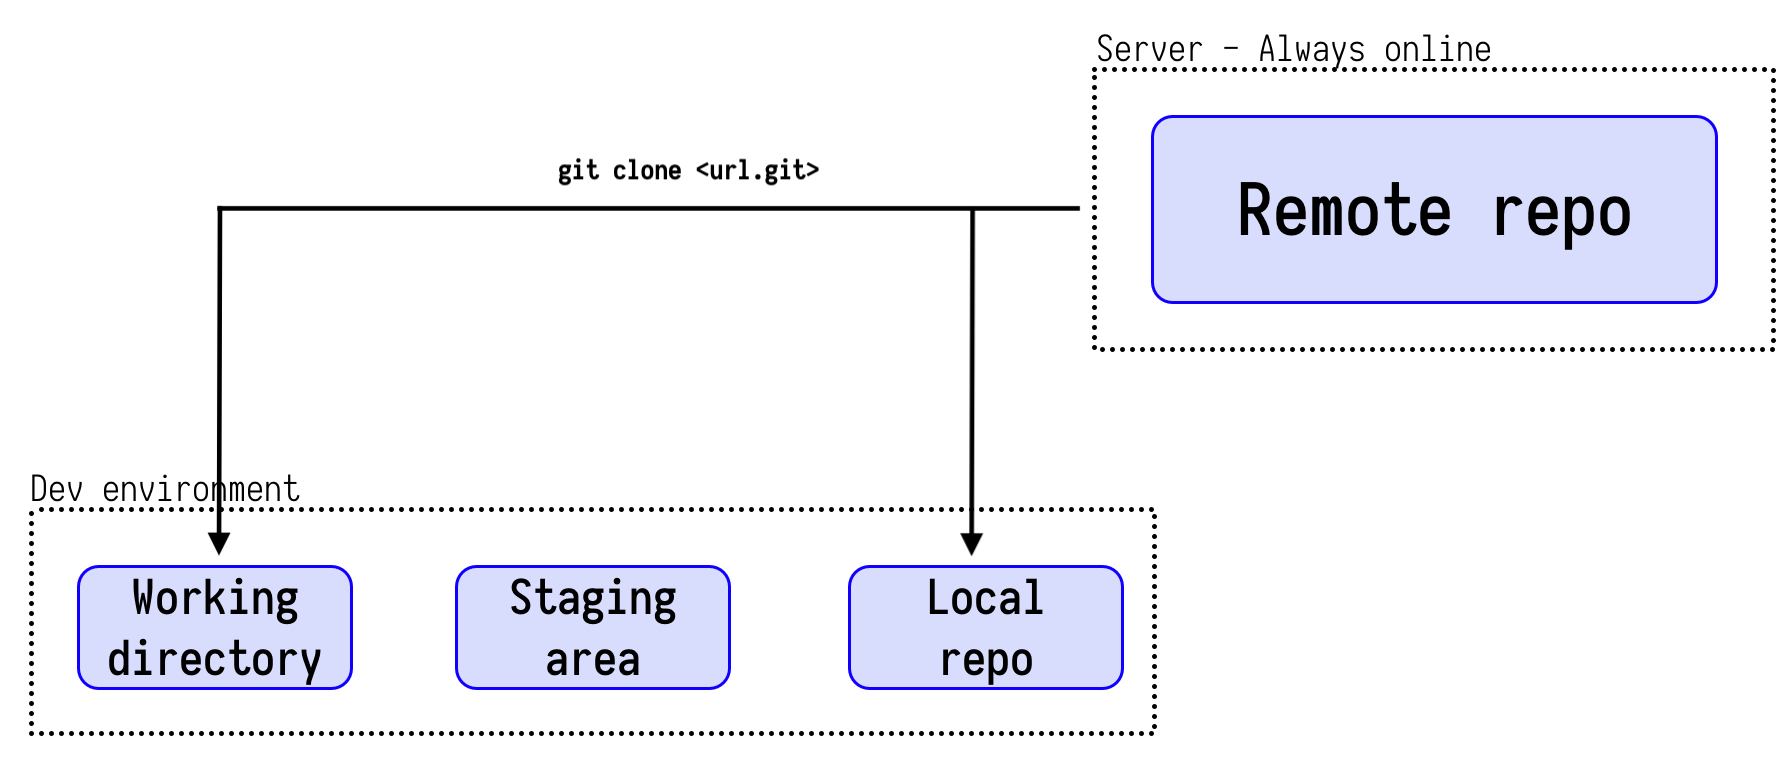
Simple workflow
-
Changes are
Added to get them to the "staging area" -
Staged changes are then
commited to the local repo. -
local repo is then
pushed to the remote repo. -
Now your changes are kept track in your local repo and remote repo.
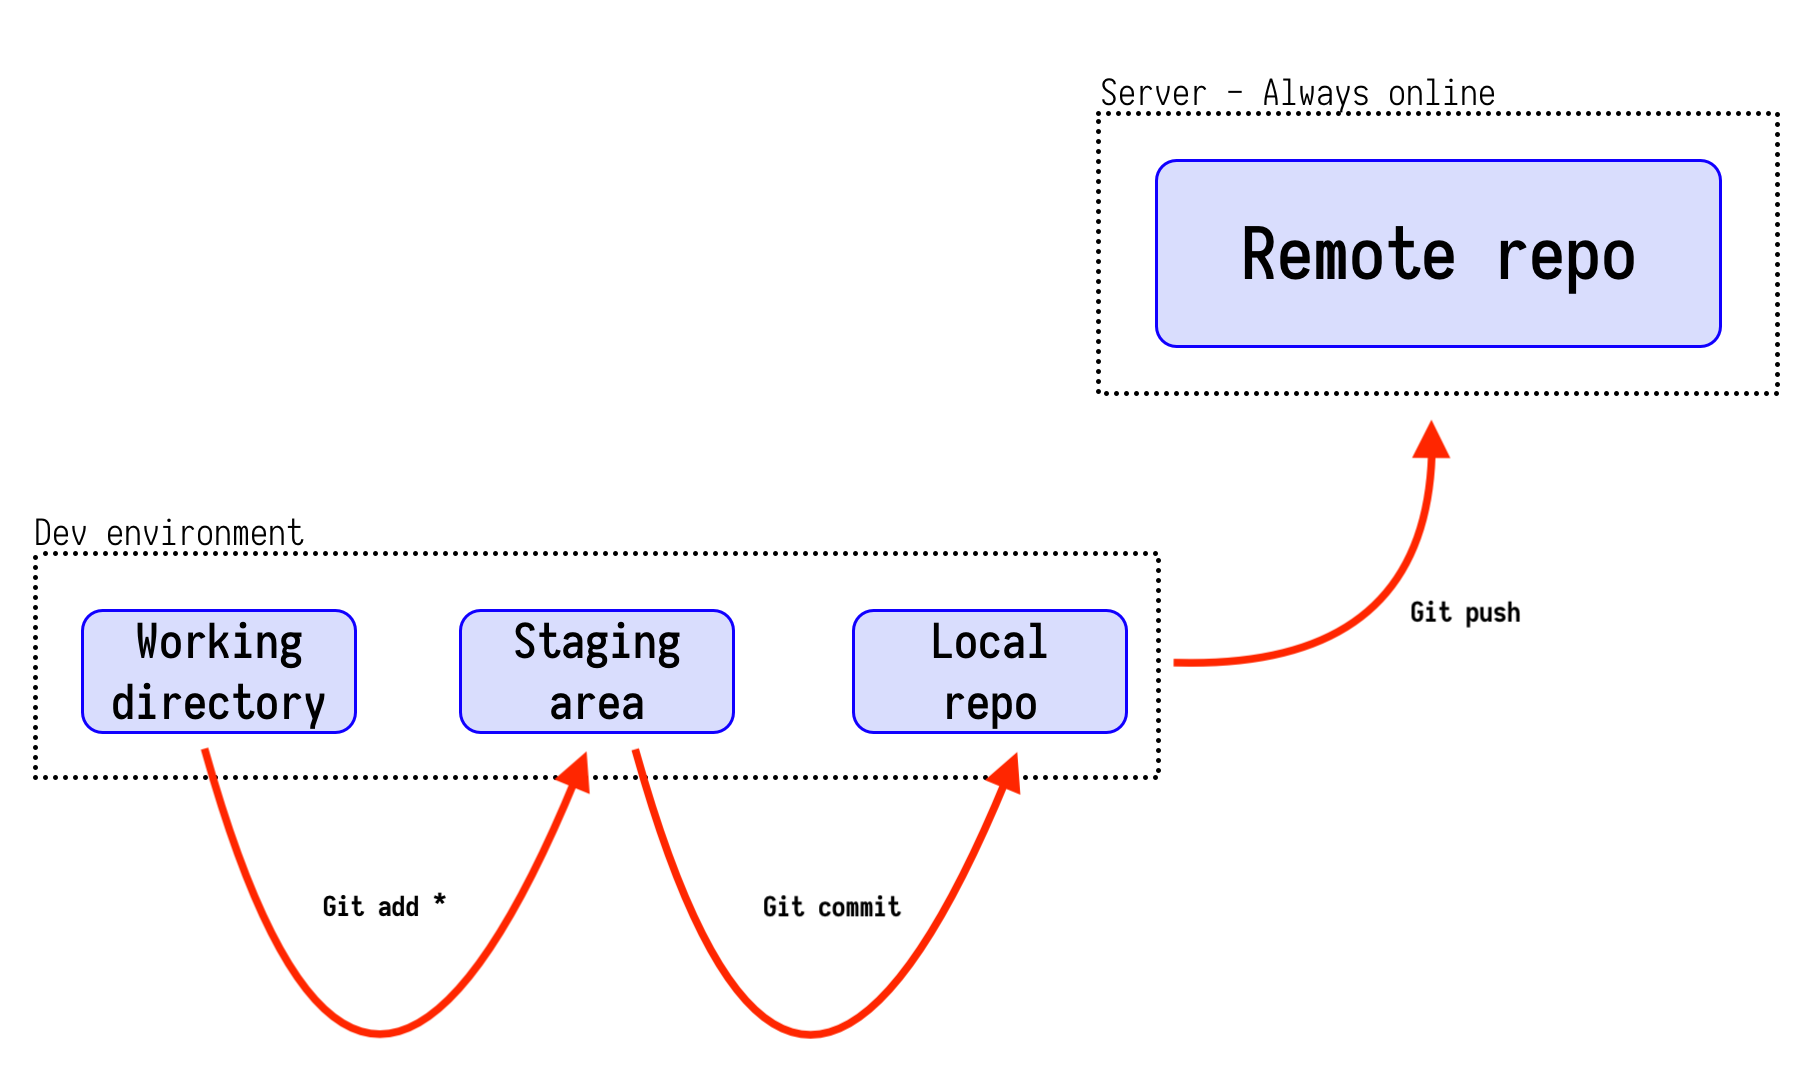
- The above workflow works for a single developer keeping their changes tracked. What happens when another developer committed and push their changes to the remote repo while you were away?
Updating local environment with latest version of the code
There are several ways of doing this:
git pullwhich does a combination of 2 steps in order to get latest version of code to your working space.-
git fetchwhich updates the local repo with content from remote repo (your working directory still does not have the latest remote changes) -
git mergemerges the local repo with your working directory.
-
Alternatively,
git pull --rebasedoes a fetch + rebase wherein, your local commits are replayed and commit history is preserved.

Viewing a log of all commits
-
git logshows a commit log of all changes along with their hashes. -
git log --onelineis more useful as it is concise and easy to copy commit hashes from.
Reverting a change
-
So you realize that a commit you made was a mistake, and it needs to be undone. After all, this is the benefit of using a version control system in the first place.
-
First do a
git log --onelineand identify the commit you want to undo, and copy its commit hash. -
Use
git revert <commit hash id>to undo a specific commit. Remember that it made this change only to your local repo. If you want to propagate your change(undo) to the remote repo, you still need to do agit push.
To Do:
- Branch - What is? How to create a new branch? Switching to it? Merging with master? What happens when merging?
- Conflicts - Example, how to resolve?
- Stashing? What is ?
- Cherry picking? What is?
References:
- https://rogerdudler.github.io/git-guide/
- https://rachelcarmena.github.io/2018/12/12/how-to-teach-git.html
- https://dev.to/unseenwizzard/learn-git-concepts-not-commands-4gjc
- https://git-scm.com/book/en/v2
- https://ohshitgit.com
- https://csswizardry.com/2017/05/little-things-i-like-to-do-with-git/
 An excellent book on Git.
- http://marklodato.github.io/visual-git-guide/index-en.html
Bash scripting

Shell or Bash in this case is used as a universal glue language to issue a string of unix commands to the system.
Note: Dont use Bash everywhere!
Although Bash is universal and elegant to programmatically execute unix commands, and apply logic to them, it can quickly get cumbersome once you start doing complex things like working with floating point numbers or find yourself needing arrays or other sophisticated datastructures. Once your script gets more complex, stop and consider writing your program in higher level programming languages like Python or Go.
A simple bash script
#!/bin/bash
echo 'Hello World'
-
#!/bin/bashis called a shebang, which tells the system how to run this script in case it is executed directly on the shell. -
Save the above script as hello.sh and run it as below..
chmod +x hello.sh
./hello.sh
or
bash hello.sh
Comments
#!/bin/bash
# This is a comment
echo 'Hello World'
Variables
Bash does not need variables to be declared of certain type. They may be numbers or characters.
#!/bin/bash
# This is how you set a value to a variable
myvariable=Hello
## Note : Variables are globally scoped by default.
## There is _no_ space before and after = sign.

# This is how you get the value of the variable later in the script
echo $myvariable
# Another variable holding a directory path
dir=/usr/home/qgg/asampath
ls -alh $dir

# Local variable
local local_var="I'm a local value"
You can also set environment variables that are accessible to any program running in the current shell session.
There are also special environment variables that are already available for your use. Some examples below.
#!/bin/bash
export SECRET="I'm a secret string used later"
echo $SECRET
# User's home directory
echo $HOME
# A colon-separated list of directories where
#         the shell looks for programs or commands to execute from.
echo $PATH
# Current working directory
echo $PWD
# User ID(numeric UID) of the current user
$UID
Quotes
#!/bin/bash

# Single quote and Double quote can be used interchangeably.
firstname="Aravindh"
lastname='Sampathkumar'
echo $firstname
echo $lastname
echo $firstname $lastname

# Escaping quotes - use alternative quotes to escape the ones you need.
echo "'a'"    # Will print 'a'
echo '"b"'    # Will print "b"

# If you need both quotes in a string Escape it with backslash
echo "'aaa' \"bbb\""   # will print 'aaa' "bbb"
Command substitution
For when you want the output of a command to be stored as value of a variable.
#!/bin/bash

myvar=$( ls /etc | wc -l )
echo There are $myvar entries in the directory /etc
now=$(date +%T)
echo $now # 19:08:26
Exit codes
Every command returns an exit code (return status or exit status).
A 0 exit code means successful completion of the command.
A non-zero (1 to 255) exit code means a failed return from the command.
Exit code is assigned to the $? environment variable. We can use this to test whether a script or a command finished successfully or not.
Example:
uid=$(id -u asampath)
if [ $? -eq 0 ]; then
        echo "INFO: User account verified of existence. "
else
        echo "ERROR: User account was not created properly. " >&2
        exit 1
fi
exit keyword can be used to exit a function or terminate a script. In both cases it returns the exit code of the last command executed before exit.
Arithmetic operations
Arithmetic expression must enclosed by $(( ))
x=1
y=2
echo $(( 1 + 3 ))     # 4
echo $(( ++x + y++ )) # 4
echo $(( x + y ))     # 5
Commandline arguments
Sometimes, you need arguments to be passed to your script. For example copy <src_file> <dest_file>
#!/bin/bash

cp $1 $2
echo Copied $1 to $2
Save the above script as copy.sh and execute the above script passing the parameters as
./copy.sh test1 test2
Streams
Streams are simply sequences of characters that may be redirected into files or other streams.
| Code | Descriptor | Description |
|---|---|---|
| 0 | stdin | Standard input |
| 1 | stdout | Standard output |
| 2 | stderr | Standard error |
Redirections are what makes streams useful.
| Operator | Description |
|---|---|
> | Redirect output |
2> | Redirect error |
&> | Redirect output and error |
>> | Redirect output but append to destination |
2>> | Redirect error but append to destination |
&>> | Redirect output and error but append to destination |
< | Redirect input to this command/script |
command > out.log
command >> out.log
command 2> err.log
command 2>> err.log
command &> out_and_err.log
command &>> out_and_err.log
command 2> err.log 1> out.log
command 2>> err.log 1>> out.log
How about a T junction in streams?
| tee is used to create T break in a stream - to redirect the same stream to 2 destinations.
echo $(cmd) | tee file1 file2

# Redirect both stdout and stderr to console and write them to a file
command 2>&1 | tee out.log
Pipes
Pipes let us use the output of a program as the input of another.
# output of command1 is fed as input to command2....
command1 | command2 | command3

# Pipe the output of myst command to grep and filter on pattern R (running jobs)
myst | grep R
Note: exit status of a pipeline is the exit code of the last command in the pipeline. If you need exit status to be the failure code if any of the commands in the pipe had failed, use the following shell option at the beginning of the script.
set -o pipefail
Command sequences
To execute multiple commands conditionally based on whether the prior command succeeded or not, you can use ;, &, && or || operators.
command2 will be executed after command1 regardless of success or failure of command1
command1 ; command2
command2 will be executed if, and only if, command1 finishes successfully (returns 0 exit status)
command1 && command2
command2 will be executed if, and only if, command1 finishes unsuccessfully (returns code of error)
command1 || command2
If a command is terminated by the control operator &, the shell executes the command asynchronously in a subshell (in the background)
command1 &
command2 &
command3 &
In the above example, all three commands run concurrently in the background in their own subshells.
What if you want the "parent" script to wait until or some of the background tasks to finish before doing something else?
wait command is your answer.
https://stackoverflow.com/questions/1131484/wait-for-bash-background-jobs-in-script-to-be-finished
Conditional execution
if statement and case statement - decide to perform an action or not.
Expression should be enclosed in [[ ]]
String based expressions
| Expression | Meaning |
|---|---|
| [[ -z STR ]] | STR is empty |
| [[ -n STR ]] | STR is not empty |
| [[ STR1 == STR2 ]] | STR1 and STR2 are equal |
| [[ STR1 != STR2 ]] | STR1 and STR2 are not equal |
Numeric expressions
| Expression | Meaning |
|---|---|
| [[ NUM1 -eq NUM2 ]] | NUM1 and NUM2 are equal |
| [[ NUM1 -ne NUM2 ]] | NUM1 and NUM2 are not equal |
| [[ NUM1 -lt NUM2 ]] | NUM1 is lesser than NUM2 |
| [[ NUM1 -le NUM2 ]] | NUM1 is less than or equal to NUM2 |
| [[ NUM1 -gt NUM2 ]] | NUM1 is greater than NUM2 |
| [[ NUM1 -ge NUM2 ]] | NUM1 is greater than or equal to NUM2 |
Logical evaluations
| Expression | Meaning |
|---|---|
| [[ ! EXPR ]] | NOT operator. True if EXPR is false |
| [[ EXPR1 ]] && [[ EXPR2 ]] | AND operator. True if both EXPR1 and EXPR2 are true |
| [[ EXPR1 -a EXPR2 ]] | AND operator. True if both EXPR1 and EXPR2 are true |
| [[ EXPR1 ]] | |
| [[ EXPR1 -o EXPR2 ]] | OR operator. True if either EXPR1 or EXPR2 is true |
File condition based expressions
| Expression | Meaning |
|---|---|
| [[ -e FILE ]] | True if FILE exists |
| [ -f FILE ] | True if FILE exists and is a regular file |
| [ -d FILE ] | True if FILE exists and is a directory |
| [ -r FILE ] | True if FILE exists and is readable |
| [ -w FILE ] | True if FILE exists and is writable |
| [ -x FILE ] | True if FILE exists and is executable |
| [ -L FILE ] | True if FILE exists and is symbolic link |
| [ FILE1 -nt FILE2 ] | FILE1 is newer than FILE2. |
| [ FILE1 -ot FILE2 ] | FILE1 is older than FILE2. |
Conditional execution
if [[ 1 -eq 1 ]]; then echo "true"; fi
if [[ 1 -eq 1 ]]; then
  echo "true"
fi
if [[ 2 -ne 1 ]]; then echo "true"; else echo "false"; fi
if [[ 2 -ne 1 ]]; then
  echo "true"
else
  echo "false"
fi
case "$action" in
  start | up)
    programname start
    ;;

  *)
    echo "Error: Expected {start|up}"
    ;;
esac
Flow control - for and while loops
Range based for loops
for i in {1..5}; do echo $i; done
for (( i = 0; i < 10; i++ )); do
  echo $i
done
for i in {5..50..5}; do
    echo $i
done
Looping action on files
for FILE in $HOME/*.py; do
  mv "$FILE" "${HOME}/src/"
  chmod +x "${HOME}/scripts/${FILE}"
done
While loop
x=0
while [[ $x -lt 10 ]]; do # value of x is less than 10
  echo $x
  x=$(( x + 1 )) # increment x
done
Infinite loop
while true; do
  echo "Please hit ctrl+c to stop me!"
done
Reading a file line-by-line
file="$HOME/data.txt"
while IFS= read -r line
do
	printf '%s\n' "$line"
done <"$file"
Split by fields
file="$HOME/data.txt"
while IFS=: read -r f1 f2 f3 f4 f5 f6 f7
do
        # display fields using f1, f2,..,f7
        printf 'ID: %s, Name: %s, Email: %s\n' "$f1" "$f7" "$f6"
done <"$file"
Command output can be treated as files
emails=$(ipa user-find all|grep Email|awk '{print $2}')
while IFS= read -r emailaddr
do
    printf 'Emailing to %s...\n' "$emailaddr"
    ghpcmail -t $emailaddr "Hello"
done <<< "$emails"
Using while loop to read file line-by-line
cat data.txt | while read line; do
  echo $line
done
Loop control
break statement exits the current loop before its ending.
continue statement steps over one iteration.
Functions
Functions must be declared before they are invoked.
Functions can take arguments and return an exit code.
hellofn() {
    echo "hello $1"
}

hellofn $USER
# Fn with explicit return codes
is_root_user(){
 [ $(id -u) -eq 0 ] && return 0 || return 1
}

is_root_user && echo "run as root... OK" || echo "Err: Need to be root"
# Fn that returns a string instead of just exit code
in_users(){
        users=$(w|awk '{print $1}'|tail --lines=+3)
        echo $users
}
current_users=$(in_users)
echo $current_users
Libraries and functions from other scripts
So, you want to create a library of functions that can be re-used in many scripts.
Add a file such as mylib.sh that contains your re-usable functions.
#Purpose: Make a directory and enter into it
#Args: Name of directory
#Returns: nothing
mkcd() { mkdir -p $1; cd $1 }

#Purpose: Tar GZ compress a directory or file
#Args: Name of file or directory
#Returns: nothing
targz() { tar -zcvf $1.tar.gz $1; }

#Purpose: Extract a Tar GZ archive to current location
#Args: Name of tar.gz archive as xyz.tar.gz
#Returns: nothing
untargz() { tar -zxvf $1; }
Now, you can use these functions in any script as shown below..
#!/bin/bash
. $HOME/mylib.sh
mkcd new_dir_for_data
targz DATA
untargz DATA.tar.gz
Argument parsing
Pipe friendly
Signals
Debugging a shell script
Linting and best practices - shellcheck
Example scripts:
Handy one-liners
Working with dates and times
Working with files
Logging for bash scripts
References:
- Handy bash one-liners: https://github.com/onceupon/Bash-Oneliner
- Very handy bash one-liners: https://itnext.io/increase-developer-productivity-with-unix-bash-command-one-liners-2973bccd7600
- Bash coprocesses: https://medium.com/@copyconstruct/bash-coprocess-2092a93ad912
- Bash for Production systems: https://docs.google.com/presentation/d/1a4IAux4tNo7F7mQ6fbzIVPEHxQQ0buD15Cm8vSMJFb0/mobilepresent?slide=id.g3a2df6c6c0_0_58
- Intro to Bash scripting: https://itnext.io/intro-to-bash-scripting-95c5fbc2dcef
- Bash tutorial https://linuxize.com/tags/bash/page/3/
- Bash history with Date and time: https://www.cyberciti.biz/faq/unix-linux-bash-history-display-date-time/
- Bash scripting tutorial: https://linuxconfig.org/bash-scripting-tutorial
- Replacing bash scripts with Python: https://github.com/ninjaaron/replacing-bash-scripting-with-python/blob/master/README.rst
- BASH cheatsheet : https://devhints.io/bash
- Bash notes for Professionals: http://goalkicker.com/BashBook/
- BASH tips / tricks + https://www.linuxjournal.com/article/7385
- Bash handbook: https://github.com/denysdovhan/bash-handbook
- Bash oneliners : http://www.bashoneliners.com
- Shell scripting tutorial: https://bash.cyberciti.biz/guide/Main_Page
- Bash questions : http://mywiki.wooledge.org/BashFAQ/
- Positional parameters in Bash : http://linuxcommand.org/lc3_wss0120.php
- Simple templating engine in bash: http://code.haleby.se/2015/11/20/simple-templating-engine-in-bash/
- Bash parameter substitution: https://www.cyberciti.biz/tips/bash-shell-parameter-substitution-2.html
- The excellent BASH profile : https://natelandau.com/my-mac-osx-bash_profile/
- Boilerplate of a shell script: https://natelandau.com/boilerplate-shell-script-template/
- Shell script utils : https://natelandau.com/bash-scripting-utilities/
- Serious Shell programming: https://freebsdfrau.gitbooks.io/serious-shell-programming/content/
- http://epub-manuals.ourproject.org/blog/bash-beginners-guide/
The Unix Commandline
Pardon the dust. Work in progress.
This page is intended to give you a primer on using the Unix command line to make doing science efficient and productive.

Why use Unix tools? Modularity and the Unix philosophy
Heading
- markdown list 1
- nested list 1
- nested list 2
- markdown list 2
Tale of a shell
shell ?

shell environment

text editor

shortcuts
Navigating the file system
listing files

paths

finding files
A pipe dream
what?

redirection
screen/tmux
shell scripting, automating and parallelising tasks
bash basics

Make

xargs

GNUParallel
Working with files
Working with databases
you can pipe anything to anything else, and usually it'll do something. with most of the standard linux tools, it'll even do what you expect. --scott simpson
References:
Linux Productivity tools : https://www.usenix.org/sites/default/files/conference/protected-files/lisa19_maheshwari.pdf
https://www.learnenough.com/command-line-tutorial
Conquering the commandline: http://conqueringthecommandline.com/book
https://cfenollosa.com/misc/workshop_unix_cheat_sheet.pdf
https://cfenollosa.com/misc/workshop_unix.pdf
Command-line text processing: https://github.com/learnbyexample/Command-line-text-processing
Book: Bioinformatics data skills
Free Book: The Linux Commandline - http://linuxcommand.org/tlcl.php
Commandline tools can be 236X faster than MapReduce : https://adamdrake.com/command-line-tools-can-be-235x-faster-than-your-hadoop-cluster.html
GNU Parallel: https://opensource.com/article/18/5/gnu-parallel
Feedback or suggestions to this wiki
Found any errors?
Have something to add?
Would like to me to adress something in this wiki?
Please write to me at thami@qgg.au.dk :)